# Connect to Channels
Later after you set up your bot and create a flow, check how to build flow to send your first message.
Link & Unlink
After you connect create a bot, when you unlink a bot, all data in a flow is saved includes subflows, settings and bot users. You can link the flow to another bot connection but your bot users will be removed to avoid conflicts.
# Omni Bot
Omnichannel gives you the ability to create 1 single bot and connect it to all channels supported in omnichannel.
Currently, there are 8 different channels but as we keep adding more you will be able to connect these as well.
So where you first needed 8 chatbots to each connect to their own channel you can now do the same with just 1 chatbot!
Unlike separate channels like Facebook, WhatsApp, Telegram and so on, you have 1 omnichannel per workspace. This might be subject to change in the future but keep this in mind for now when connecting your channels.
# How to create a chatbot in omnichannel
From the left-hand menu press omnichannel. You will then have two options to create your omnichannel chatbot.

1- You can create a completely new chatbot. If you are starting with an empty workspace where you don’t have any chatbots yet, this will be the most likely option you will choose.
2- If you already created a chatbot into a channel and want to use this same chatbot inside of your omnichannel, then you can choose the option “Convert Existing Chatbot”. This will also have the big advantage of importing the bot users you already have into the omnichannel chatbot.
Once you have chosen any of your preferred option you will continue to the next step.
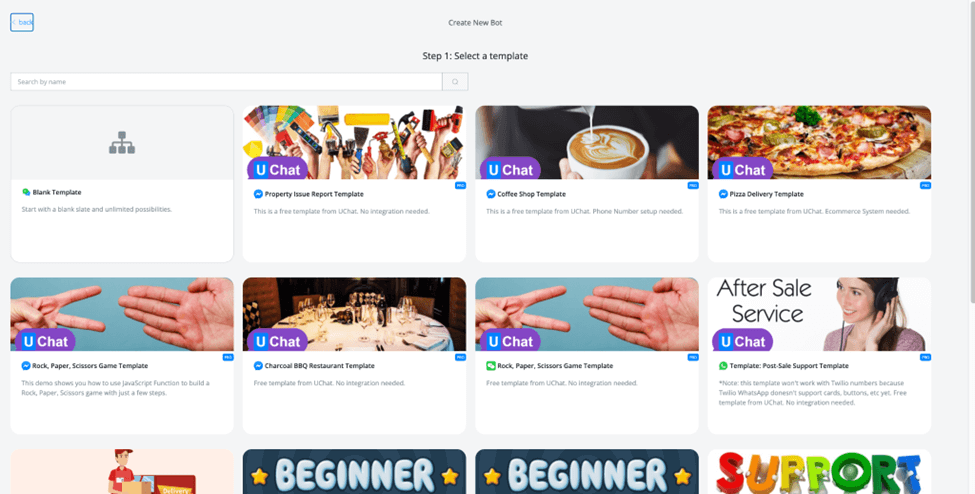
If you selected the “create new bot” then you will be taken to the template store where you can select any of the available templates, or select the option “Blank Template”. This option lets you start from scratch and you can build the chatbot to your own liking.
Once you made your choice you will be taken to the window where you are able to name your chatbot, along with adding a description.
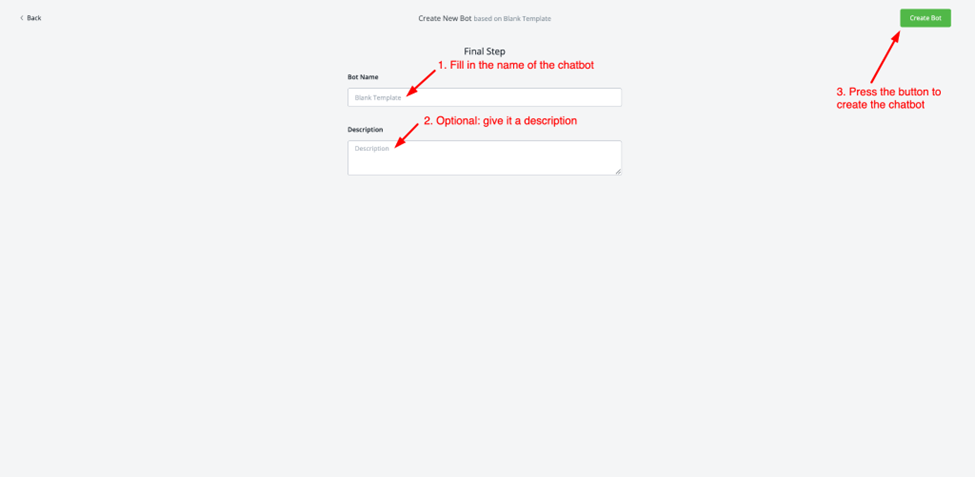
Once you are done press the green button named “create bot” and you will be able to connect the channels.
# How to connect channels to omnichannel
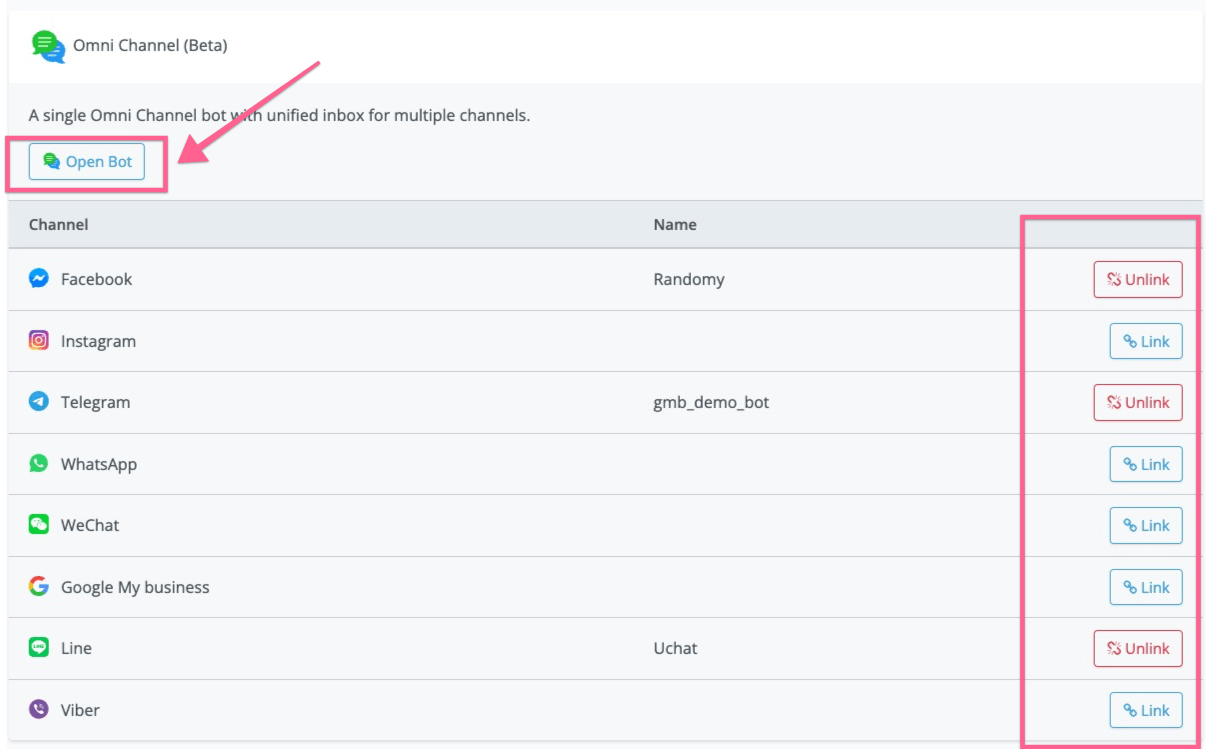
Once your omnichannel chatbot has been created, head back to the main dashboard to connect the channels you like the omnichannel to manage with this chatbot.
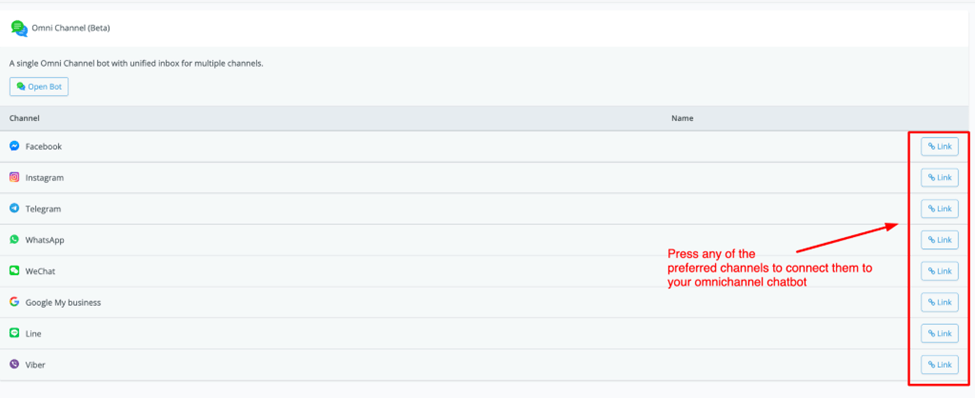
If you did not connect any channel yet to your workspace then it will take you to that specific channel to do so. Once you have added them you will be able to link them to this omnichannel chatbot.
You can unlink them at any time by pressing the button on the right-hand side.

# How to create an omnichannel flow
Now that you have created the chatbot and connected your channels you are ready to create your chatbot.
Now every single feature inside the flow builder will be available to you but do note that certain channels may not be able to use them.
# Use conditions to determine where the user is coming from
We have a condition you can use to determine which channel a user is coming from.
Just go to creating a condition, then select the “channel” option.
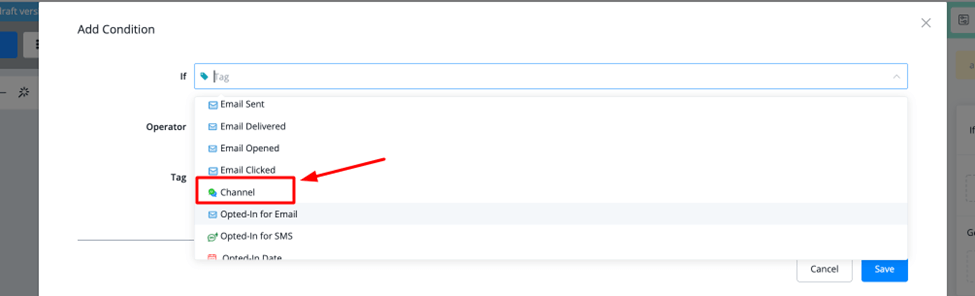
Once selected you will be able to choose from the available channels in omnichannel.

Once you set up this condition you can direct the user to specific channel features.
For example cards might be available to Messenger but not to Telegram. It does not show the same way.
So using this condition you can send a customized response for Telegram users.
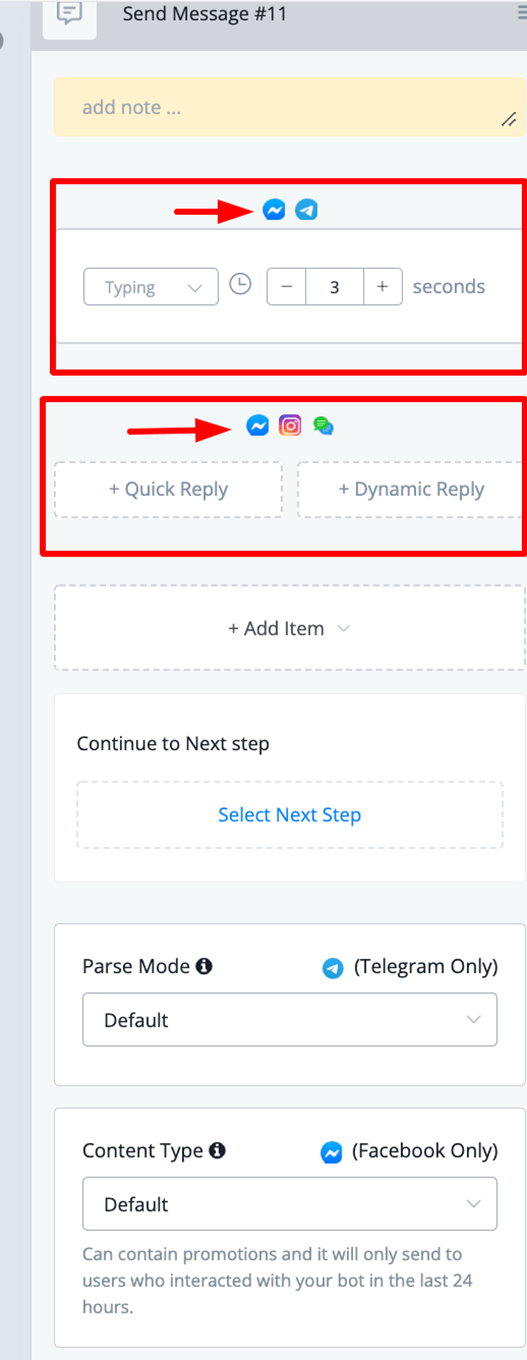
# How to determine which channels support which features?
Every block when hovering over it will show the available channels by displaying the icons of those channels at the top. See this demo video about how to check feature availability (opens new window).
You can also reference the same icons when inserting a node into the flow builder
# Facebook Bot
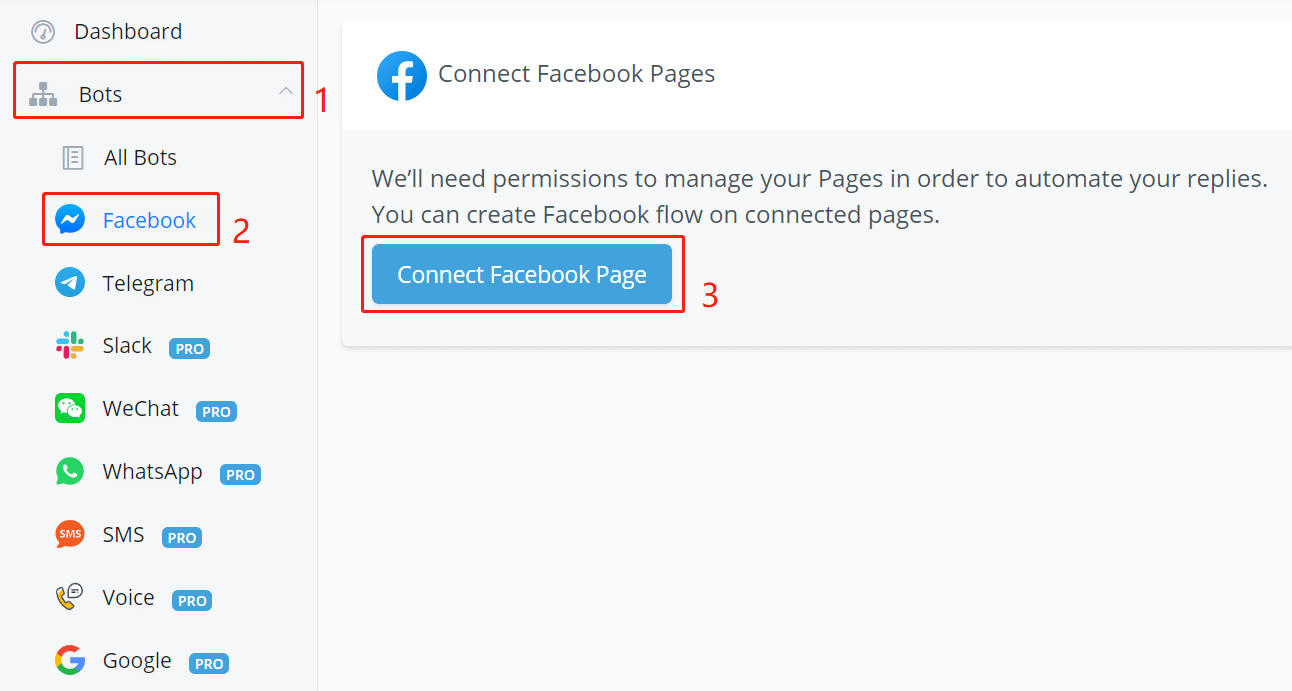
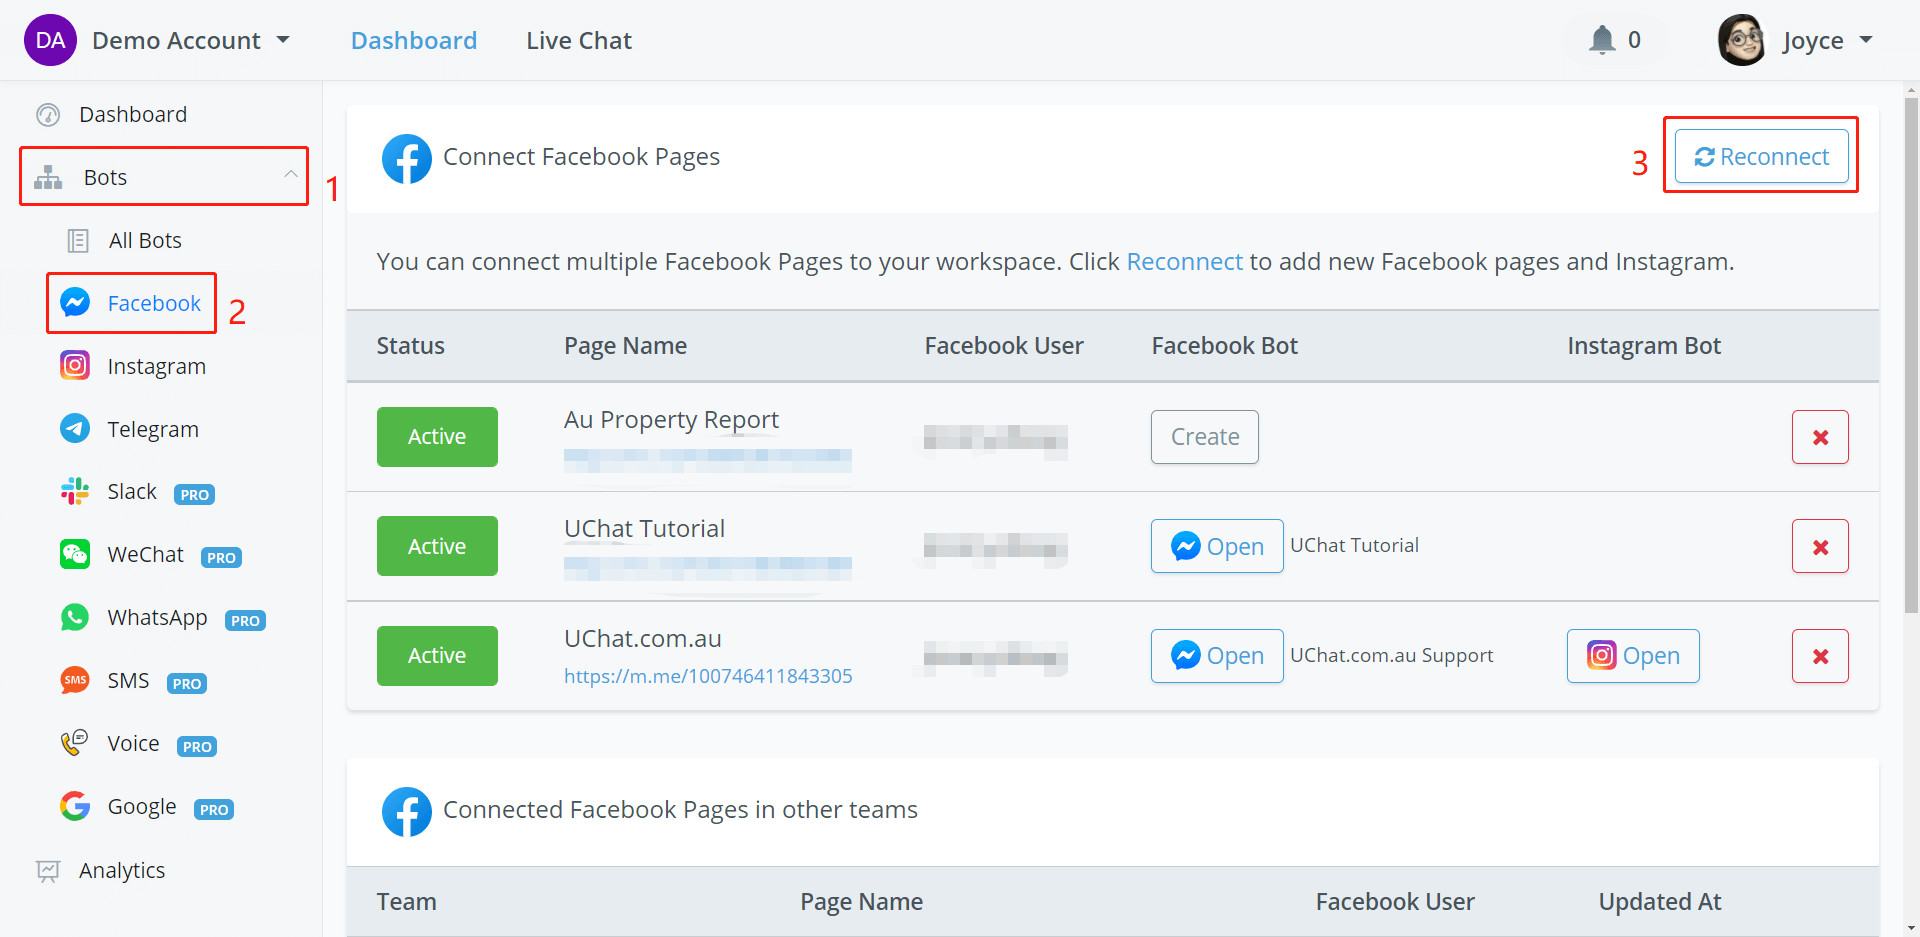
Follow steps 1, 2 and 3 in the above screenshot and jump to facebook.com, select all the pages in your page list, that you want UChat to help with the automation.
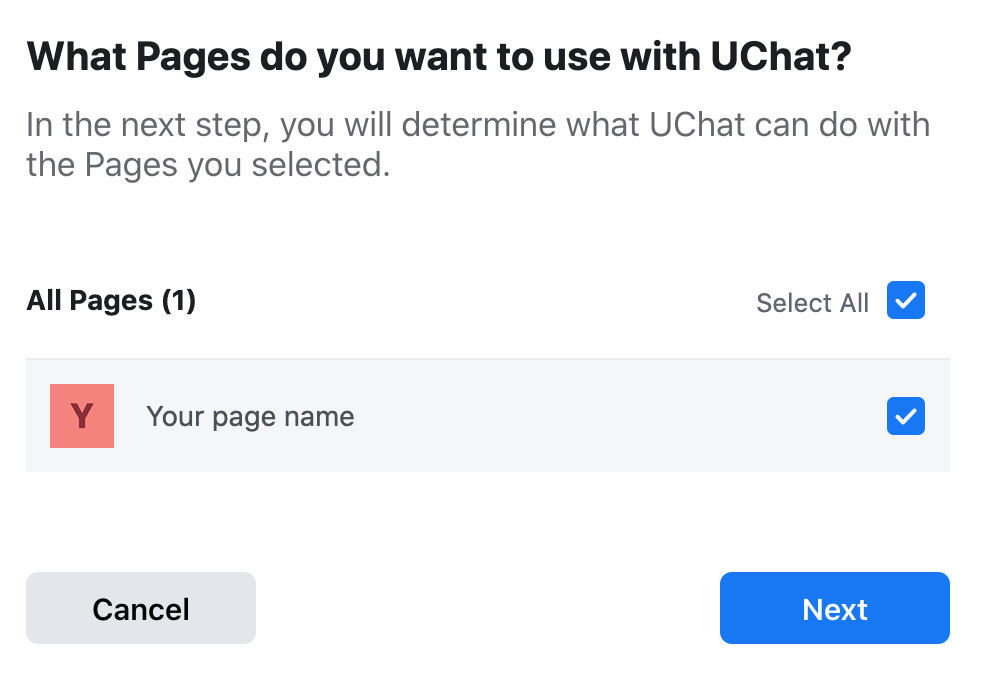
IMPORTANT
If you connect your Facebook Account with more than one workspace, remember to select all pages that require management on UChat regardless of workspace.
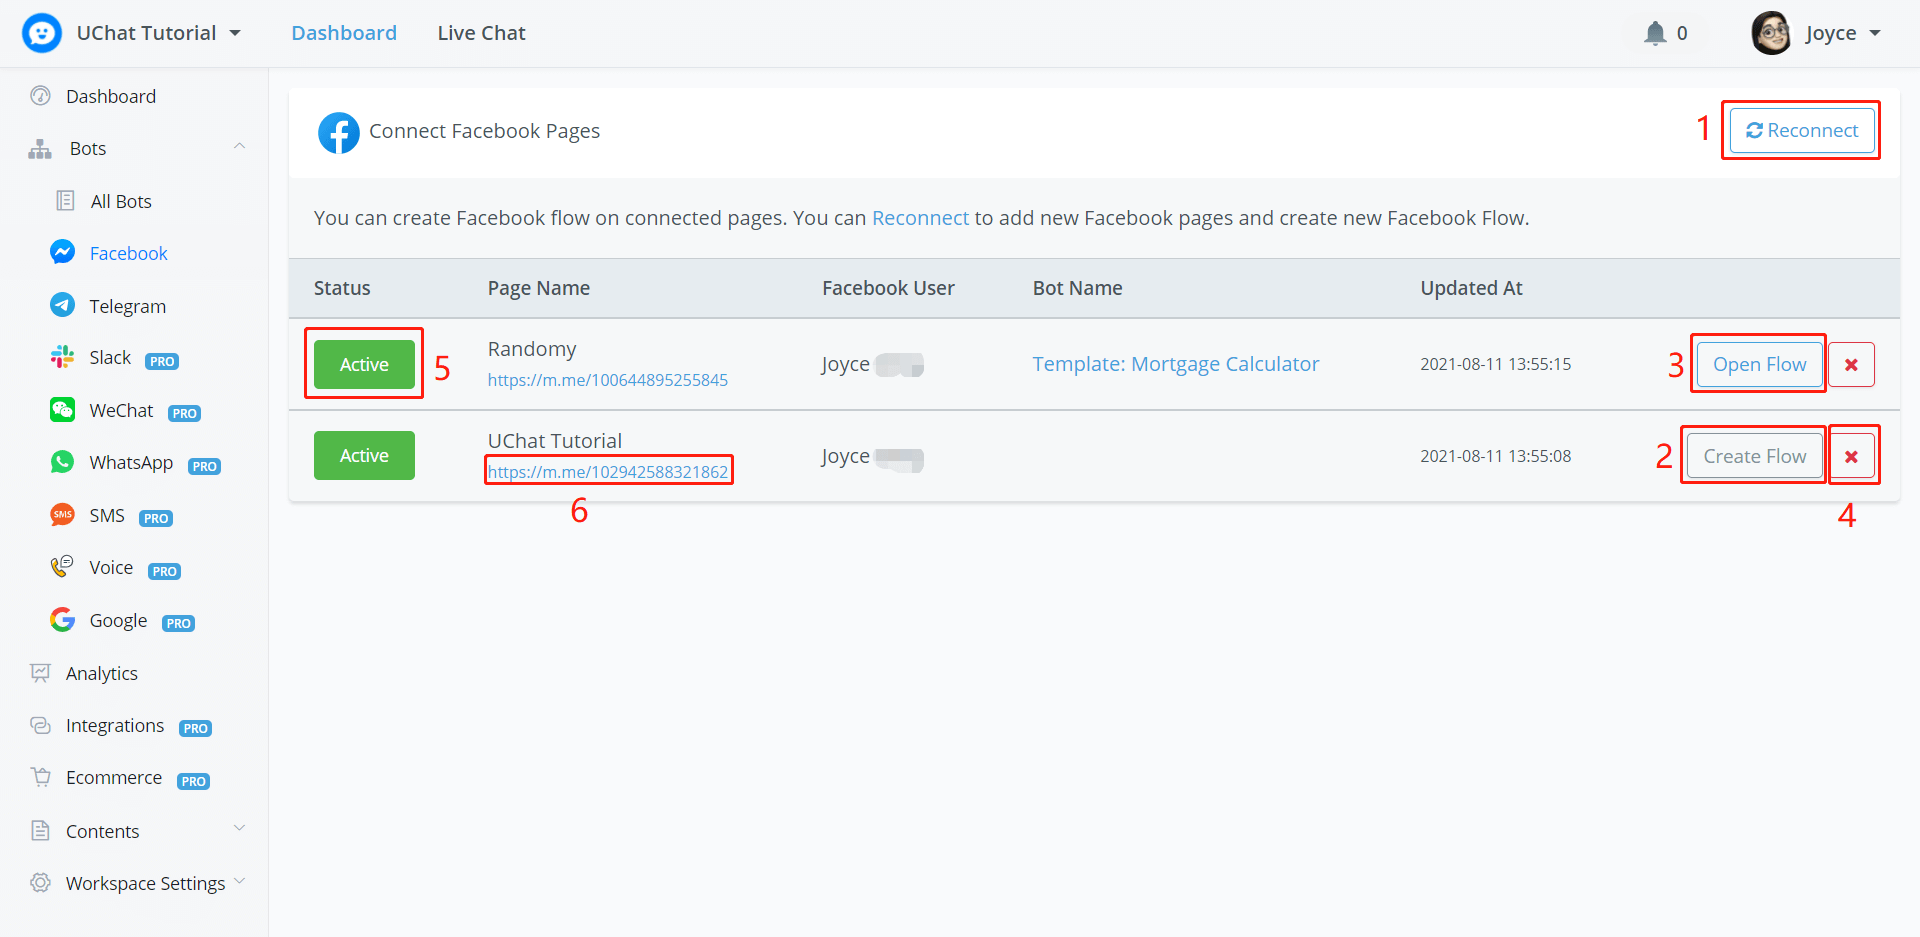
After connection, these are some of the operations in the screenshot above:
- Click "Reconnect" when you want to add/remove a page or refresh.
- Click "Create Flow" to create a new flow for the bot.
- Click "Open Flow" to enter the flow.
- Click the red x to remove the connection between the bot and your page.
- Flip the status to stop/start the automation.
- Click the link to talk to the bot. You can also share the link with other Facebook users.
Please note that
the red x is for disconnecting the flow with your page only. Your flow won't be removed. It will still stay in your workspace remain intact (in "All Bots").
# Talk to Facebook Bot
3 ways:
- Click on URL in step 6 in the above screenshot.
- Use the preview button in your flow.
- Search your page name on Facebook to visit your page and click Send Message or Message.
# Instagram Bot
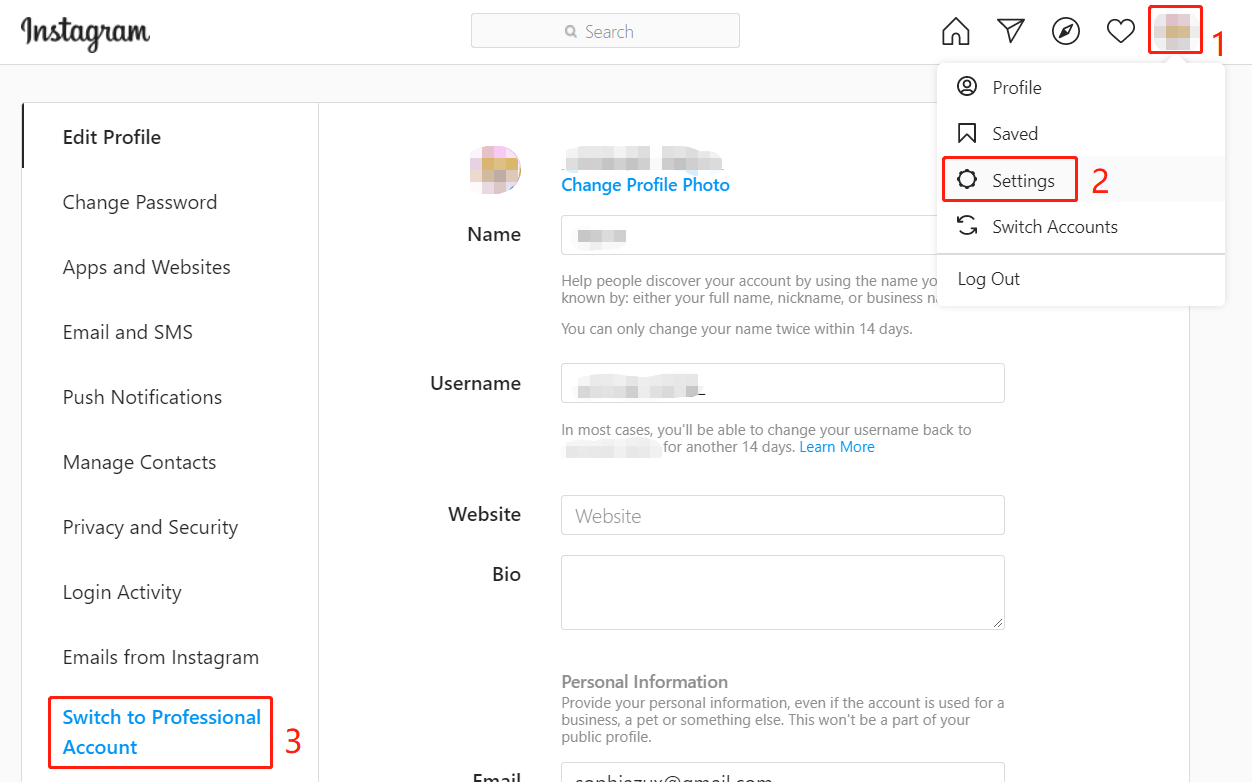
Firstly, you need an Instagram business account. To change from personal account to business account, follow steps 1, 2 and 3 in the following screenshot and choose "Business":
Then connect your Instagram business account with your Facebook page. A Facebook page is a must, if you don't have one, create a new page.
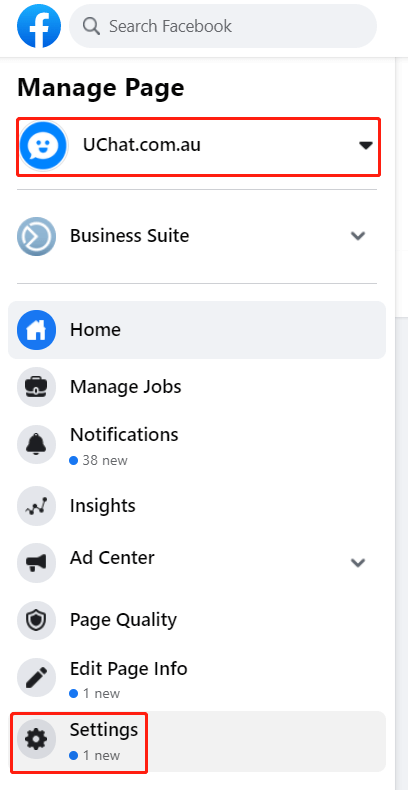
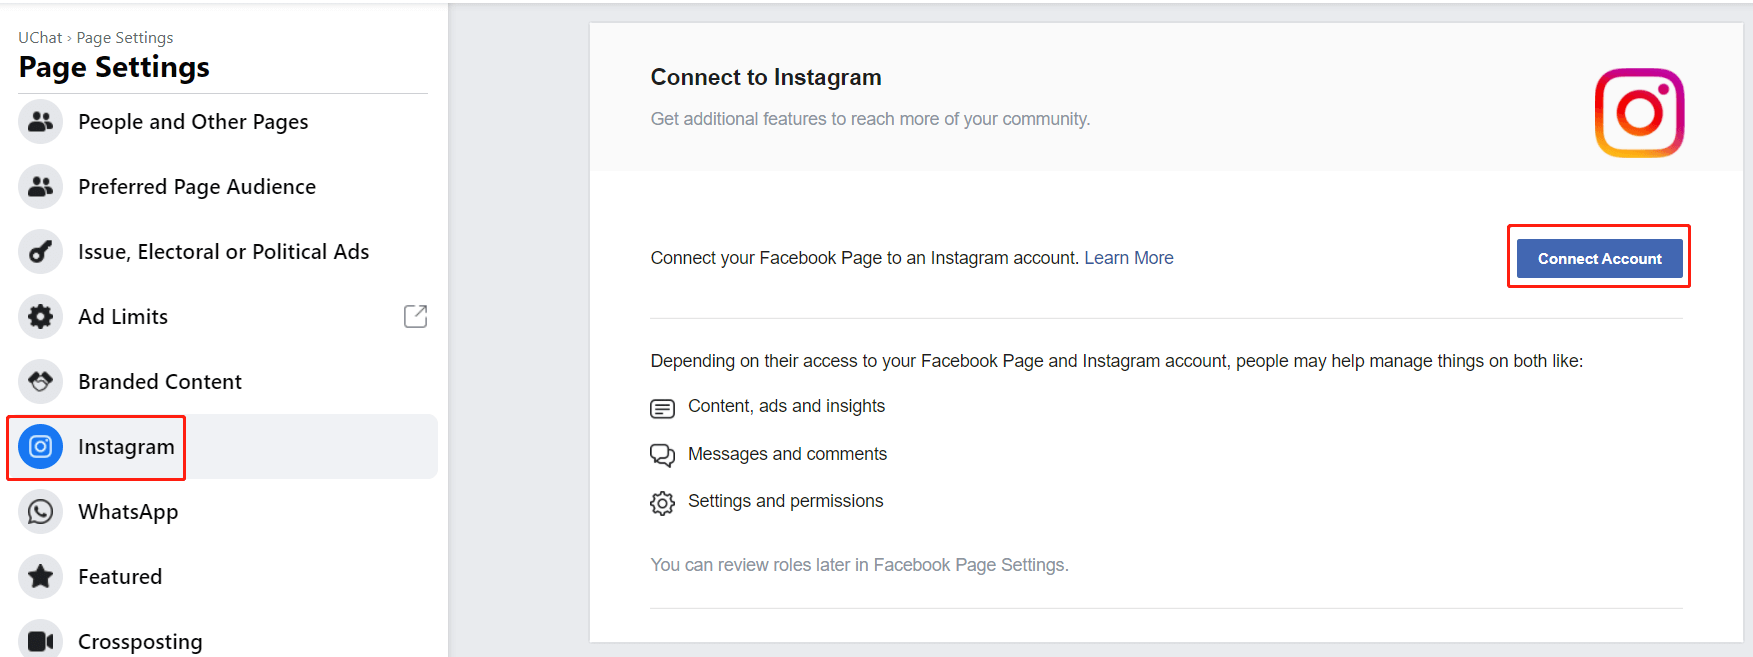
Go to the "Settings" of your Facebook page, then "Instagram", "Connect Account".
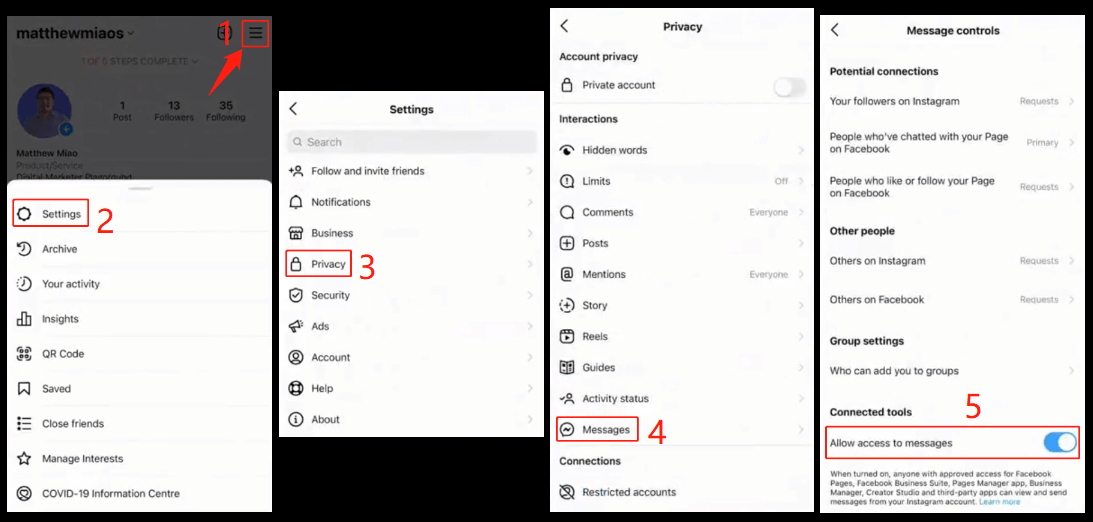
The next step is to turn on the "Allow access to messages" in your Instagram app, see steps 1 to 5 in the following screenshot: Menu - Settings - Privacy - Messages - Allow access to messages
Finally, in UChat, let's connect your Instagram with UChat. Go "Facebook" and "Reconnect" (Yes, Facebook, not Instagram):
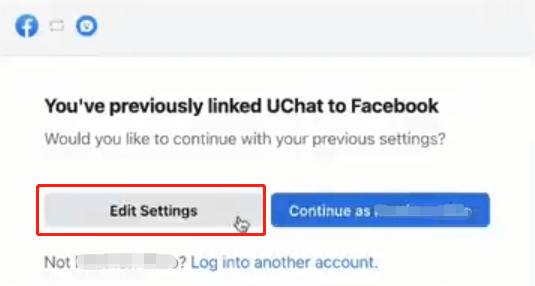
Continue as yourself or click "Edit Settings" if you've previously linked UChat to your Facebook.
IMPORTANT
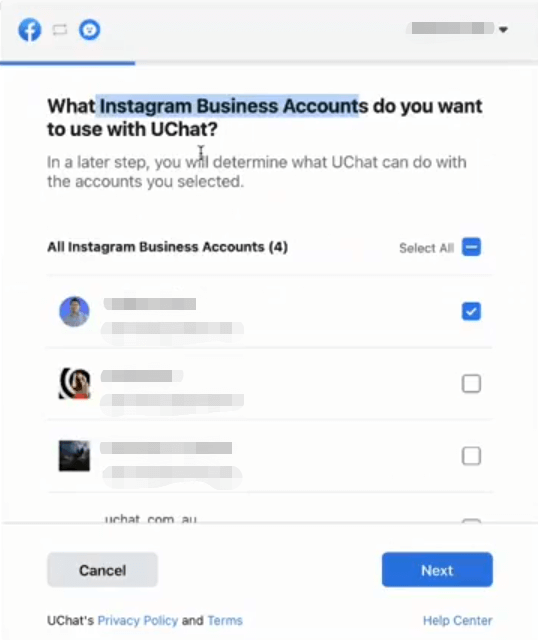
In the above screenshot, select ALL the Instagram Business Accounts that you wanted to use with UChat, not just for the current workspace.
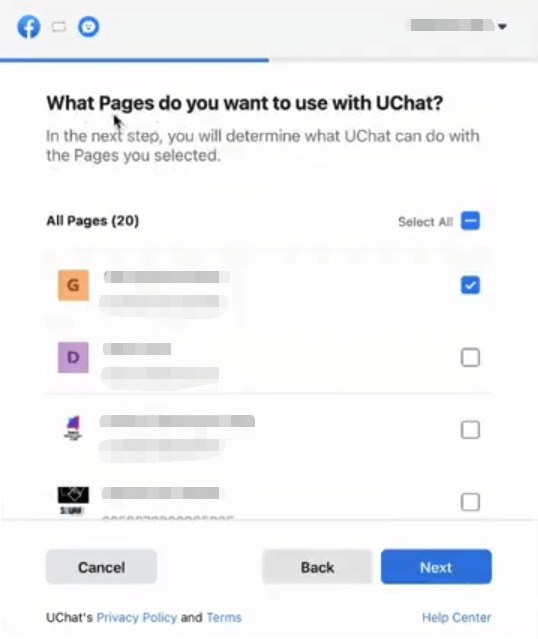
IMPORTANT
Similarly, in the above screenshot, select ALL the Facebook pages that you wanted to use with UChat, not just the page that connects to the Instagram account.
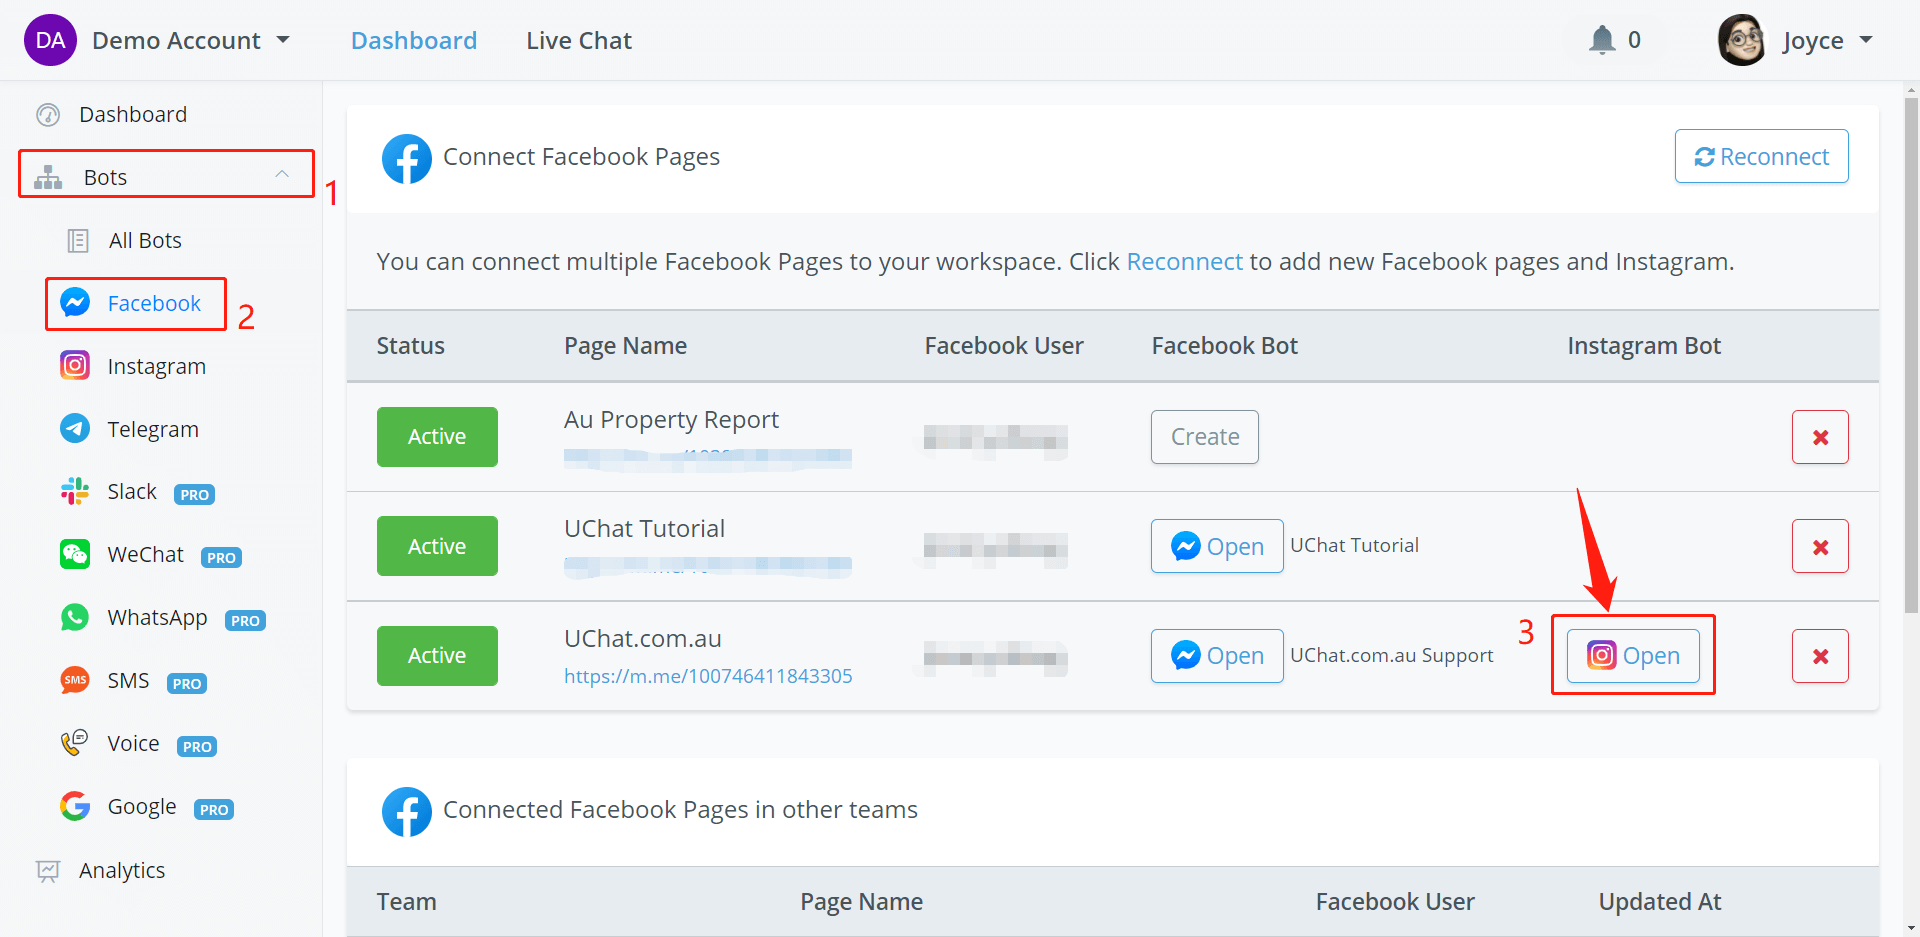
Give all permissions and after the connection, you are able to see your Instagram flow in both "Facebook" and "Instagram":
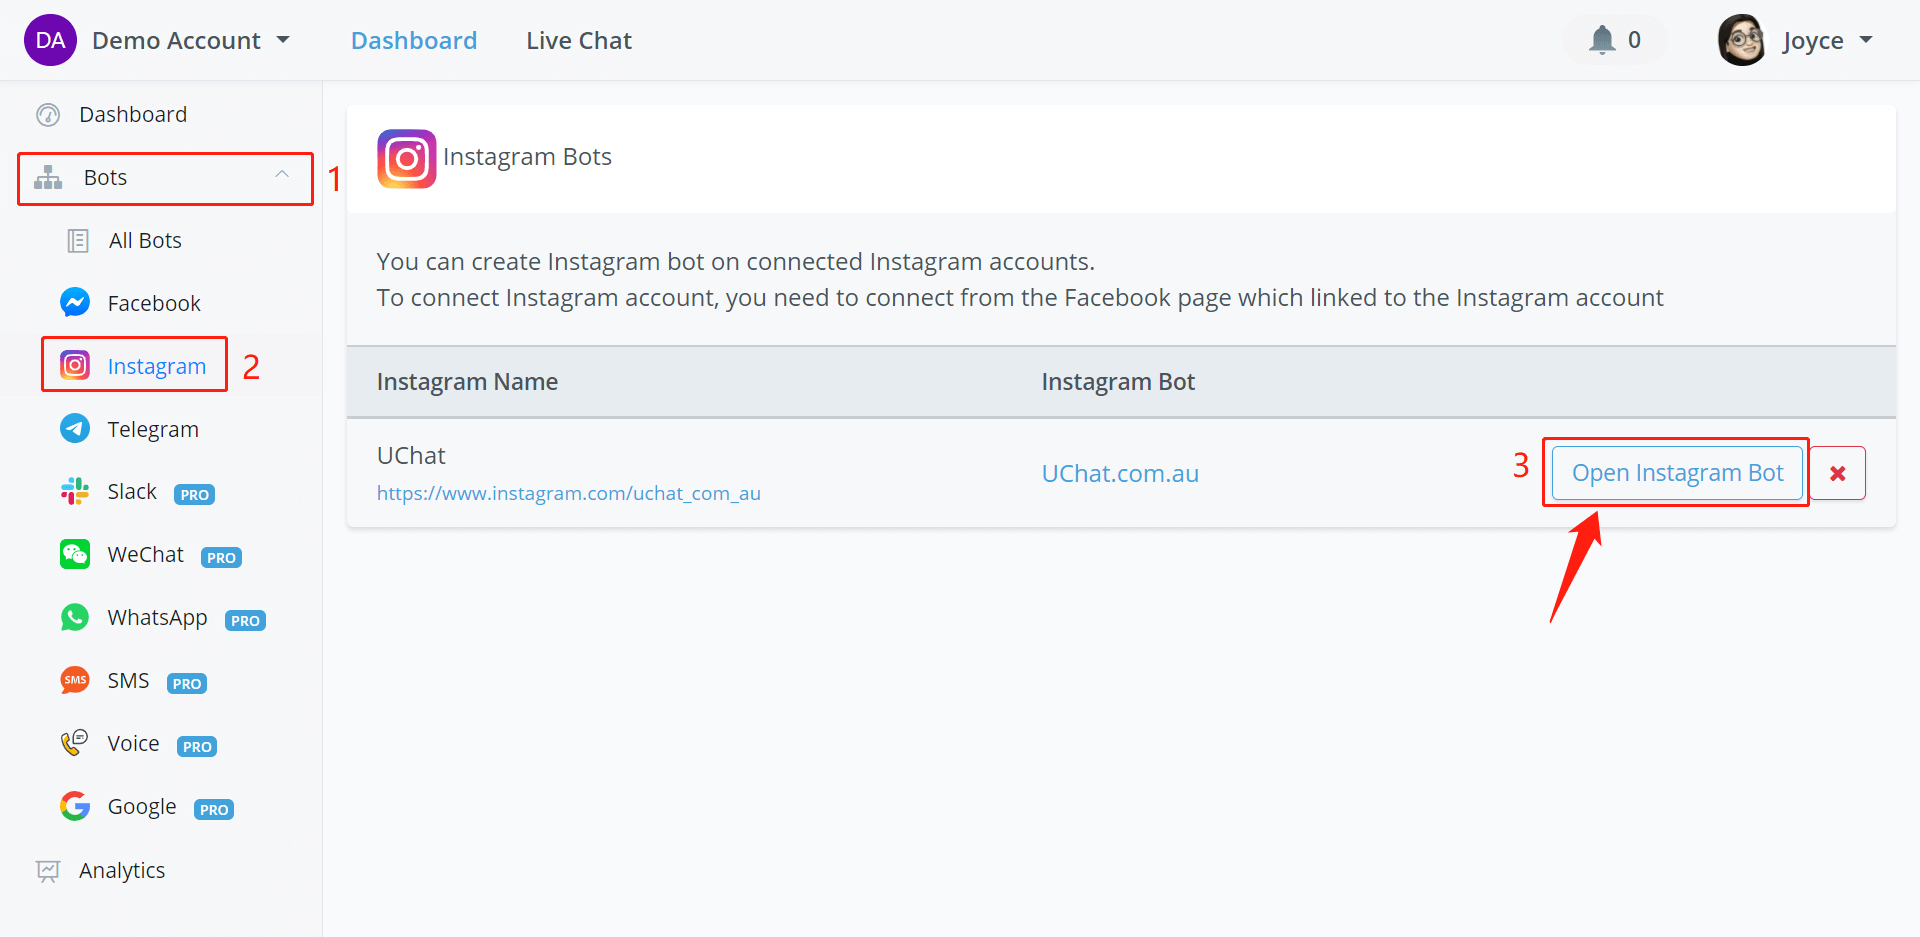
# Talk to Instagram Bot
Instagram doesn't support Preview feature, so to talk to your Instagram bot:
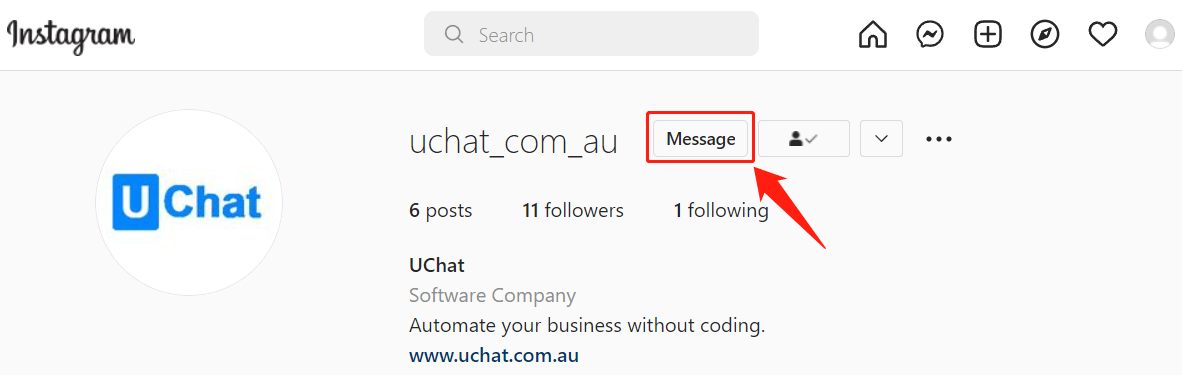
- Search your account name on Instagram or goto the Instagram section on UChat dashboard, click on the URL link below the bot name to visit your Instagram page
- follow the account and click Message to start the conversation.
# Telegram Bot
On your phone, visit https://t.me/BotFather (opens new window) from a browser. Click "SEND MESSAGE" and you will jump to the Telegram application. Click "Start" at the bottom to talk to @BotFather.
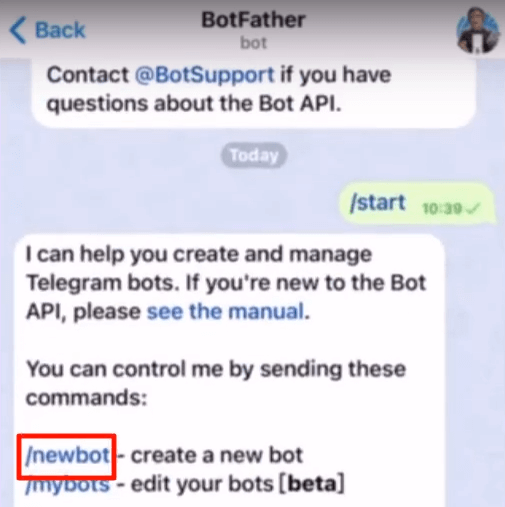
Send "/newbot", then a username for your bot. You will get a token like this:
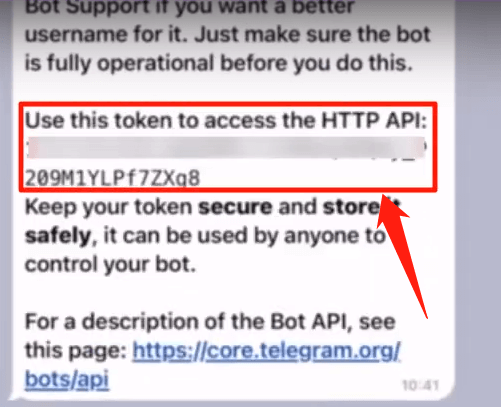
Copy the token and back to UChat.
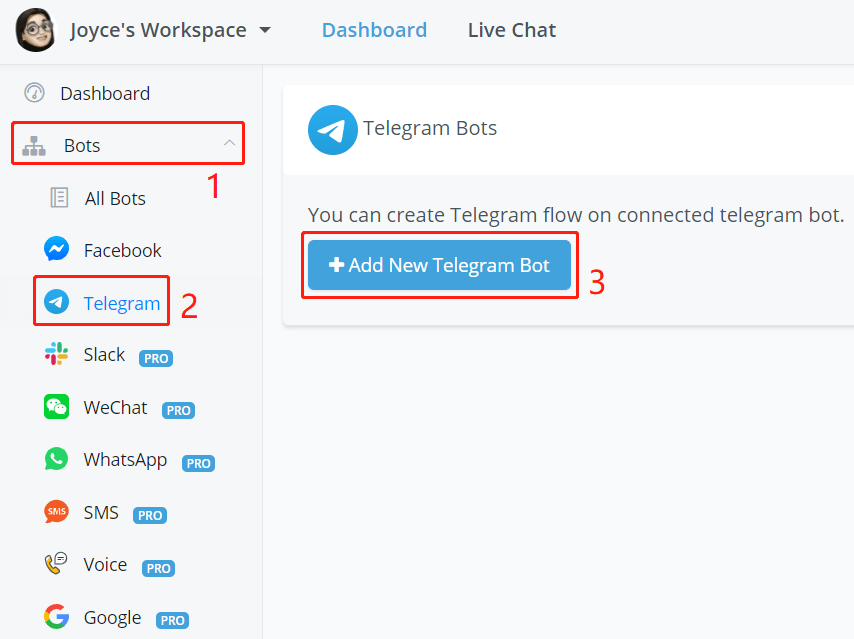
In UChat, click "Add New Telegram Bot" and put your token in the pop-up window. Finally, click "Create Flow" and there you go!
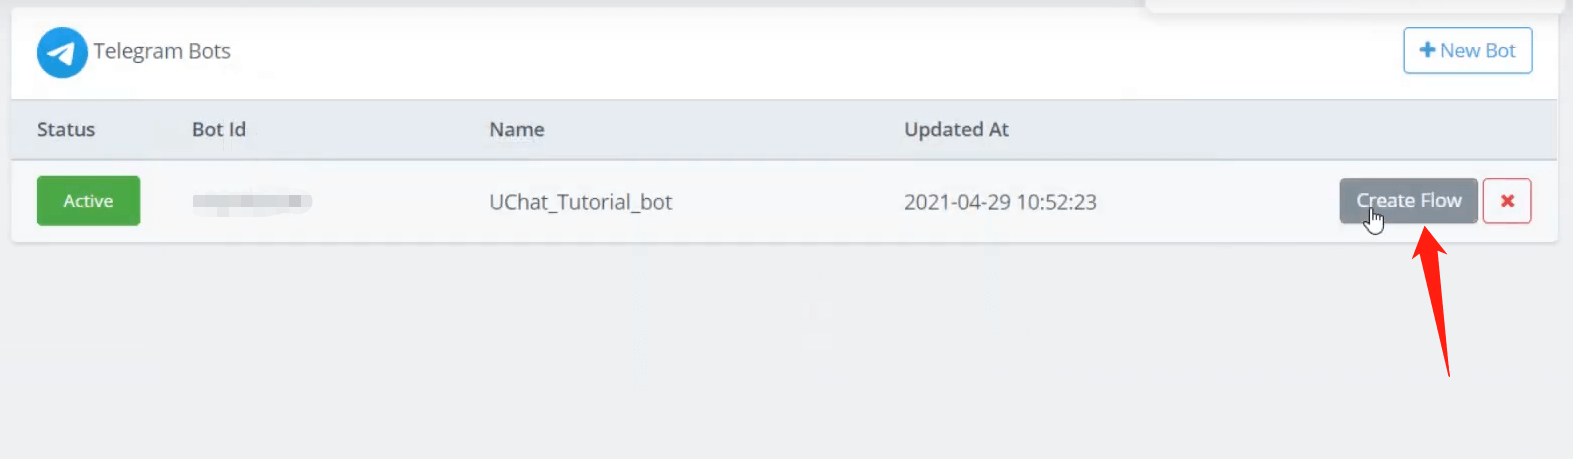
Flip the status to stop/start the automation and click the red x to remove the connection (your flow will be still in "All Bots")
# Talk to Telegram Bot
2 ways:

- Click the URL link above.
- Use the preview button in your flow.
# Slack Bot
For now, UChat is able to send various types of messages to your Slack group or contacts mainly for notification purposes.
In Progress ...
We are working on building more functions for Slack bots. The documentation would be updated as soon as we have done that. Should you have any query, please feel free to contact us via the UChat support bot in the bottom right corner on uchat.com.au (opens new window).
# WeChat Bot
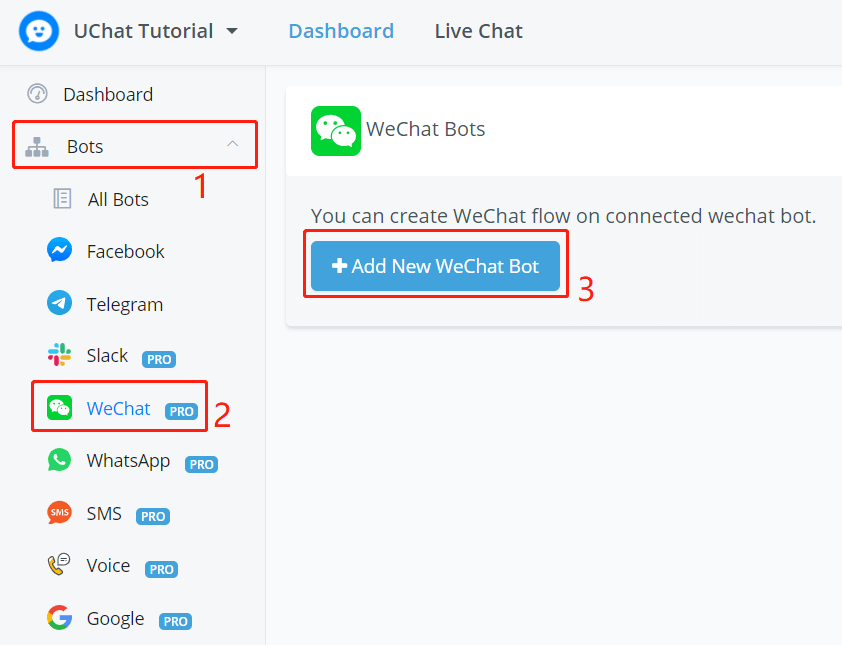
Follow steps 1, 2 and 3 in the above screenshot.
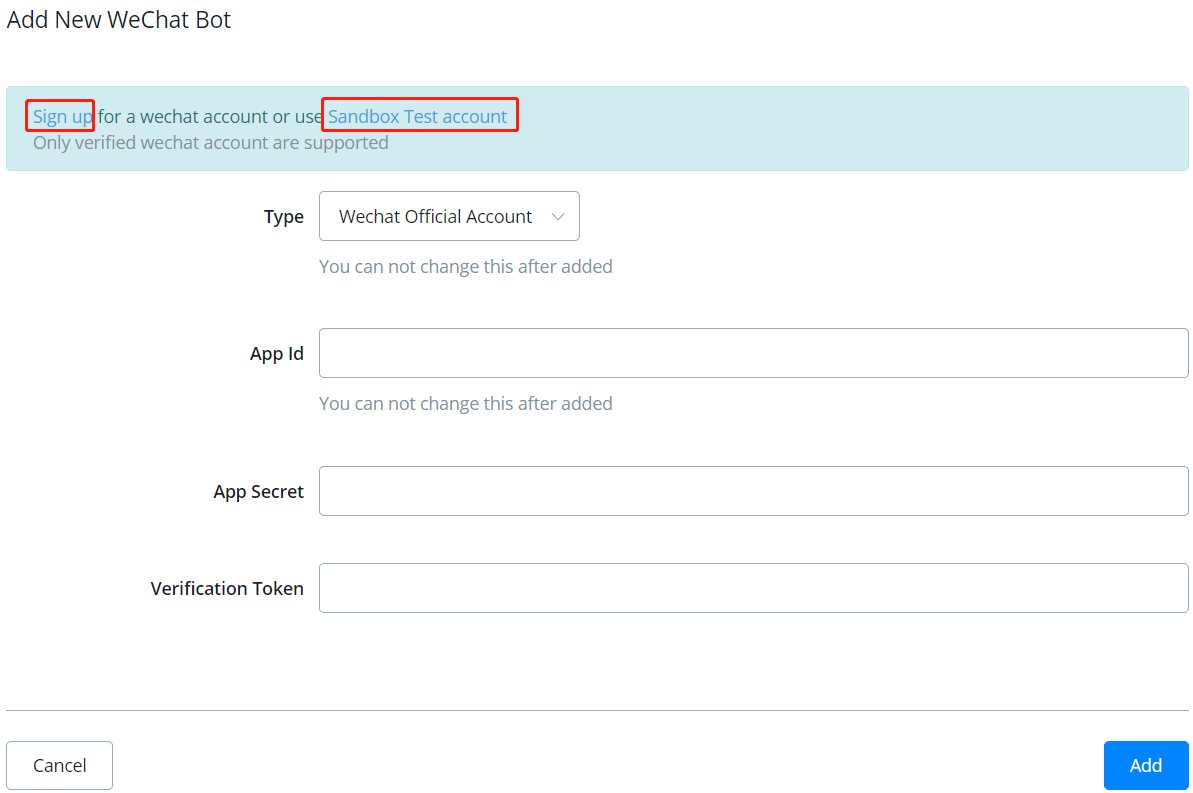
- If you already have a WeChat official account or wanted to register one, click "Sign up"
- If you don't have an official account yet, click "Sandbox Test account" to test the bot with your WeChat personal account
TIP
You can choose English on the WeChat website by clicking the globe icon on the upper right side. However, some pages do not support translation.
Login yourself with your WeChat account. On the top, you can see your "appID" and "appsecret" as below:
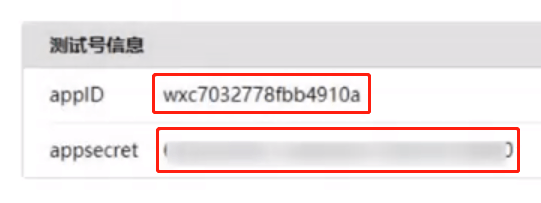
Copy them back to UChat. Follow the steps below:
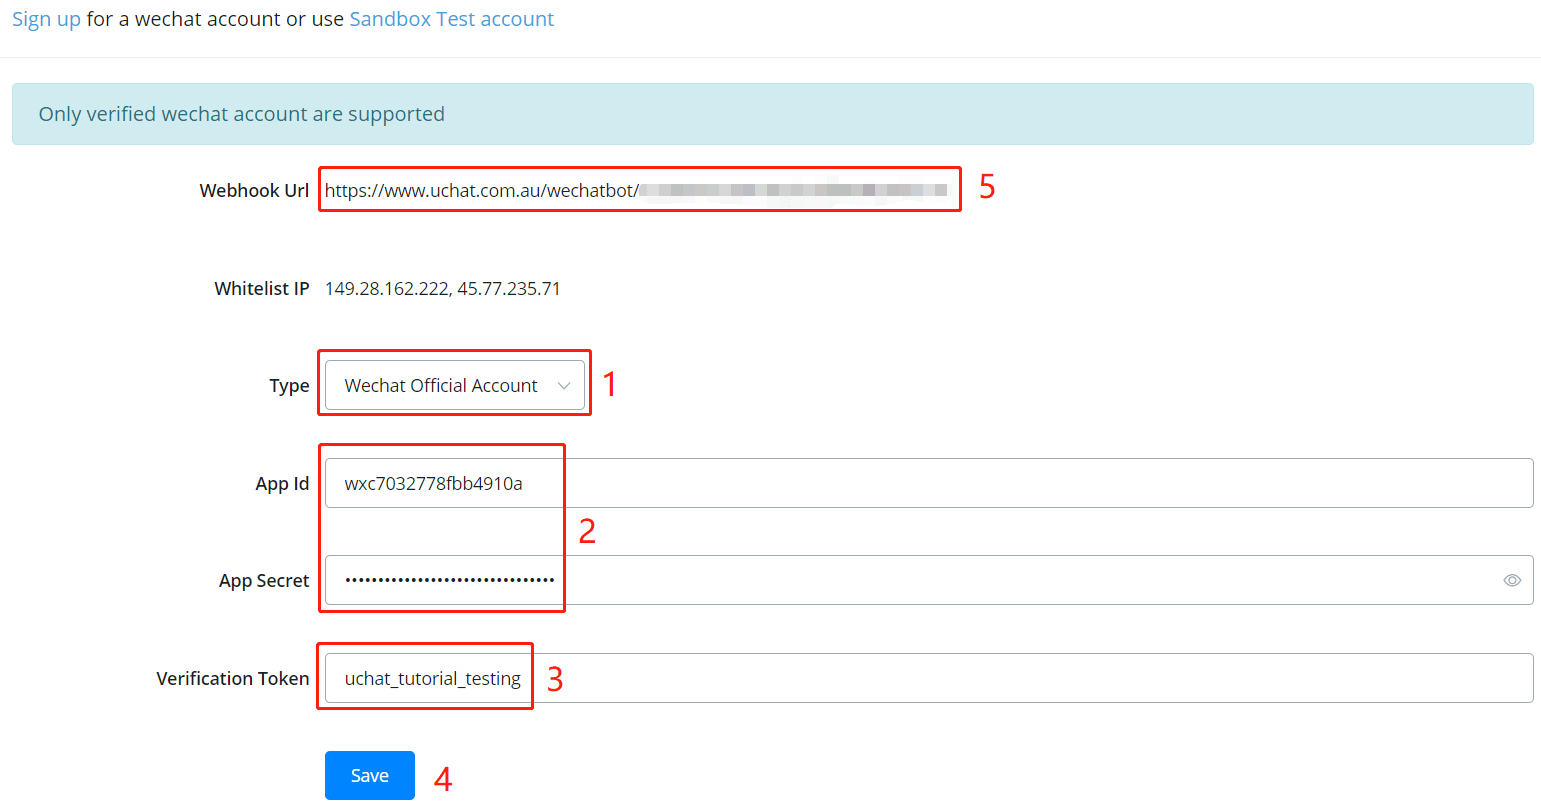
- choose a type
- paste your App ID and secret
- name a token yourself
- click "Save"
- a webhook URL will show, copy it to the WeChat's website
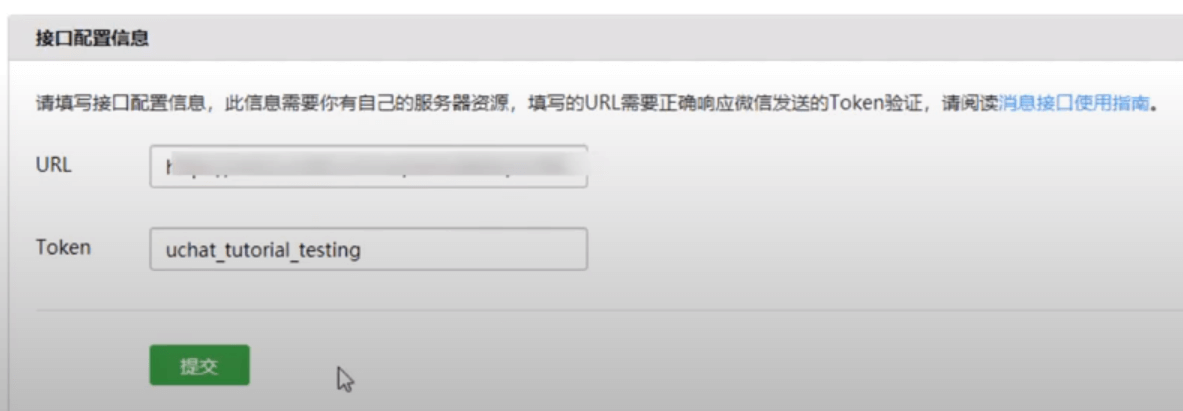
Paste the webhook URL (in step 5) and the token (in step 3) here then click the green "Submit" button. Finally, scroll down a bit, you can see your testing QR code:
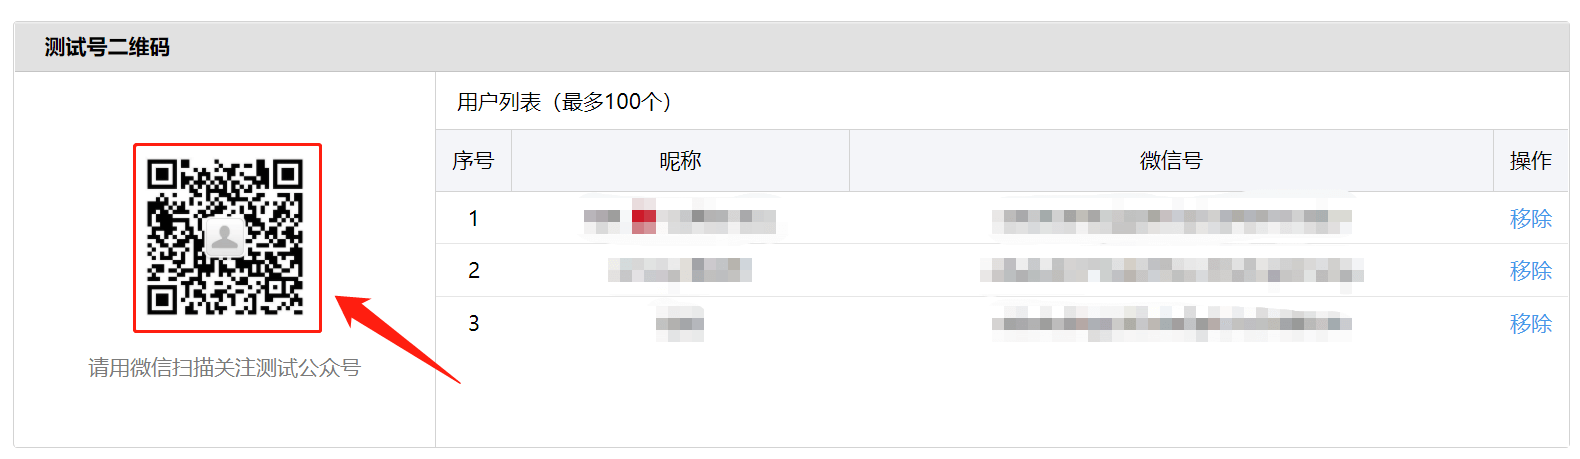
# Talk to WeChat Bot
Now you can share your QR code with any WeChat user. By scanning and following your official/testing account, they are able to talk to your bot. Besides, their nickname and WeChatID will be listed here (100 users maximum).
# WhatsApp, SMS & Voice Bot
# Pick Providers
As follow are the providers we currently work with. Different providers support different bots. Choose your provider according to your needs. Create an account with them and pick your number.
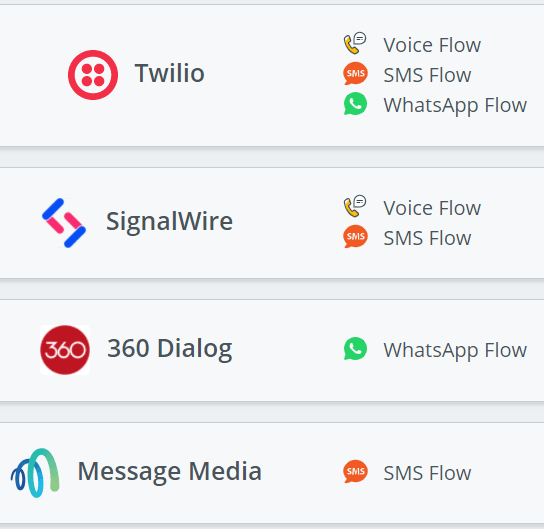
UChat has put links for you to jump to their official websites. You can either access them in the according channel (see screenshot above) or on the "Integration" page (see screenshot below).
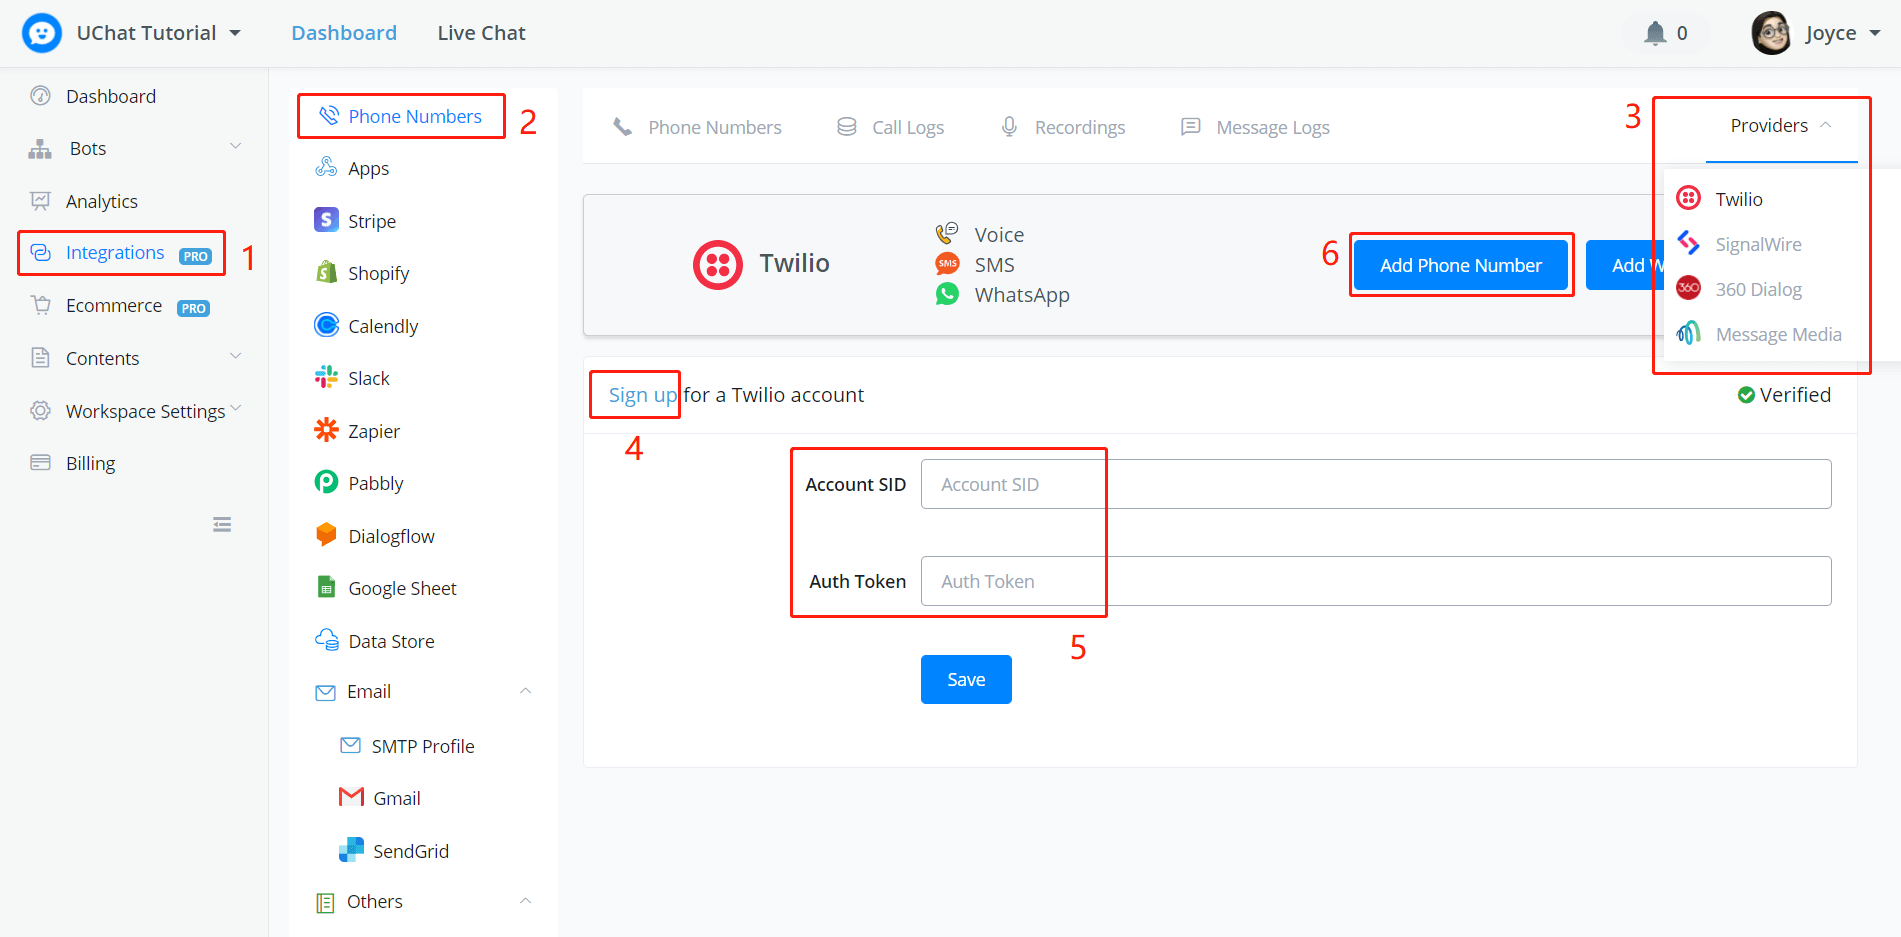
Follow the steps in the above screenshots to connect to the provider and add numbers.
# Sign Up & Get Numbers
Take Twilio as an example. On their website, sign up, login in, then you will get to your dashboard:
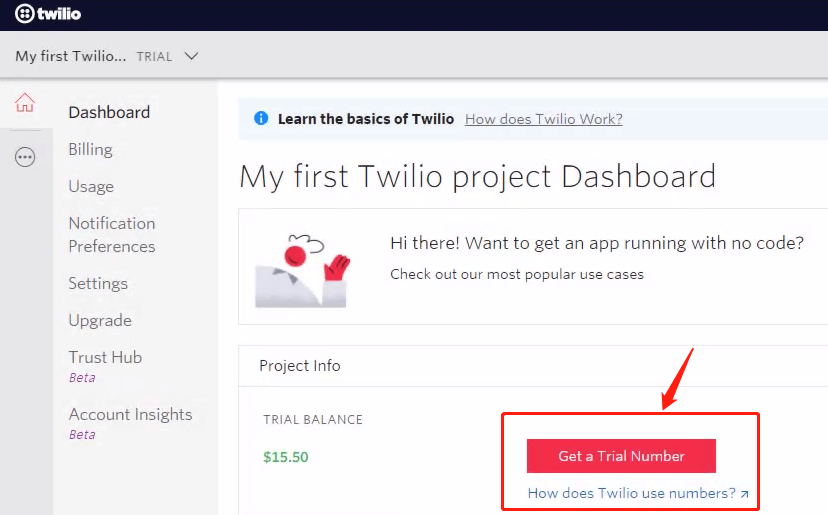
Click "Get a Trail Number".
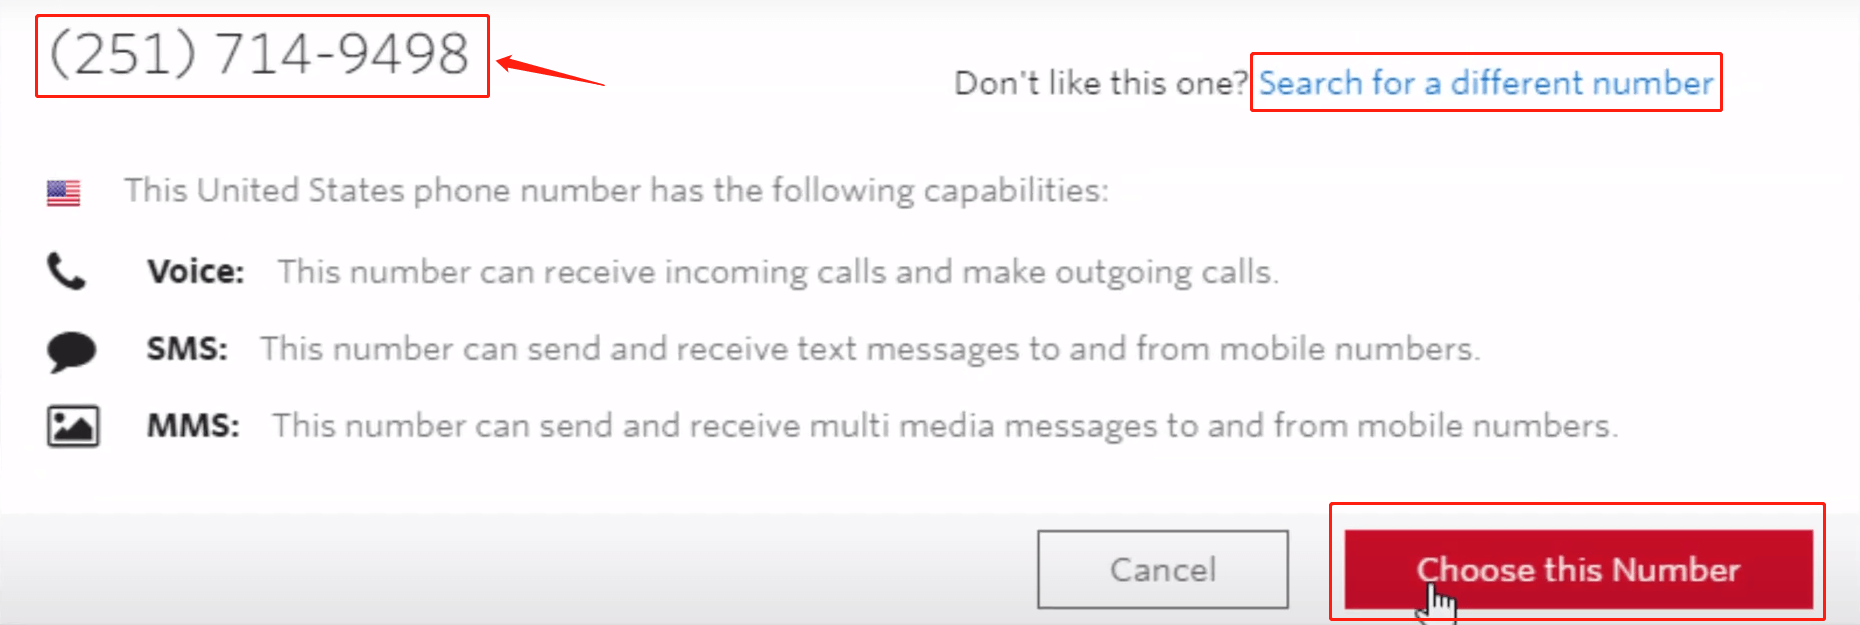
In the pop-up window, the number is shown on the upper left side, click "Choose this Number" or "Search for a different number". Then you have your own number!
# Connect to Provider
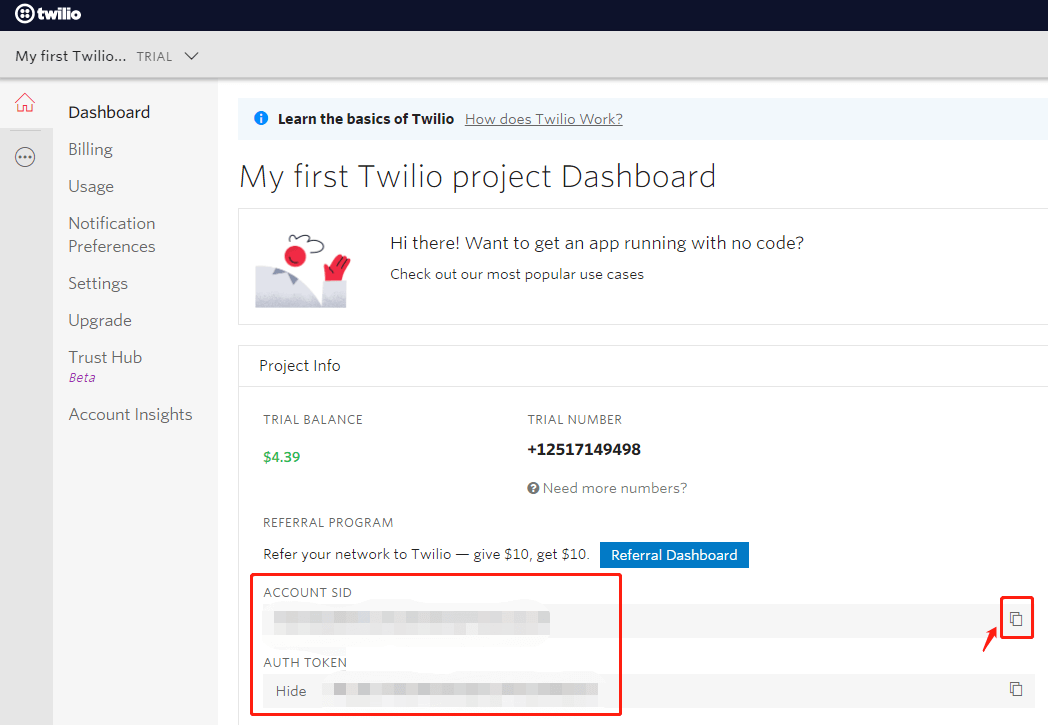
In your provider dashboard, click the little button on the right side to copy your "ACCOUNT SID" and "AUTH TOKEN" value back to UChat:
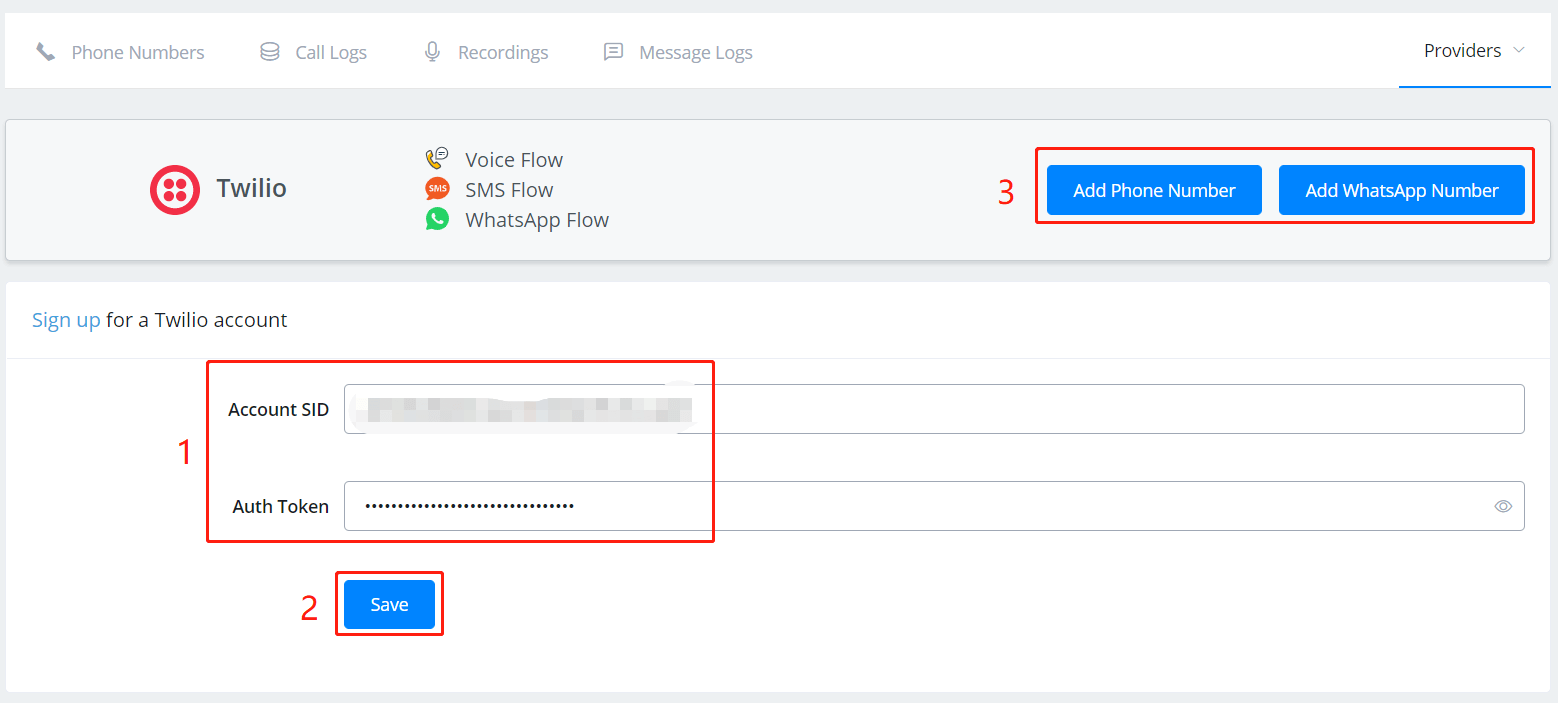
- put your copied values in corresponding fields.
- click "Save".
- click "Add Phone Number" if you are building an SMS or Voice bot, otherwise, "Add WhatsApp Number".
- More information click -> Twilio Docs (opens new window)
- More information click -> 360Dialog Docs (opens new window)
- More information click -> SignalWire Docs (opens new window)
- More information click -> Message Media Docs (opens new window)
# Add Numbers
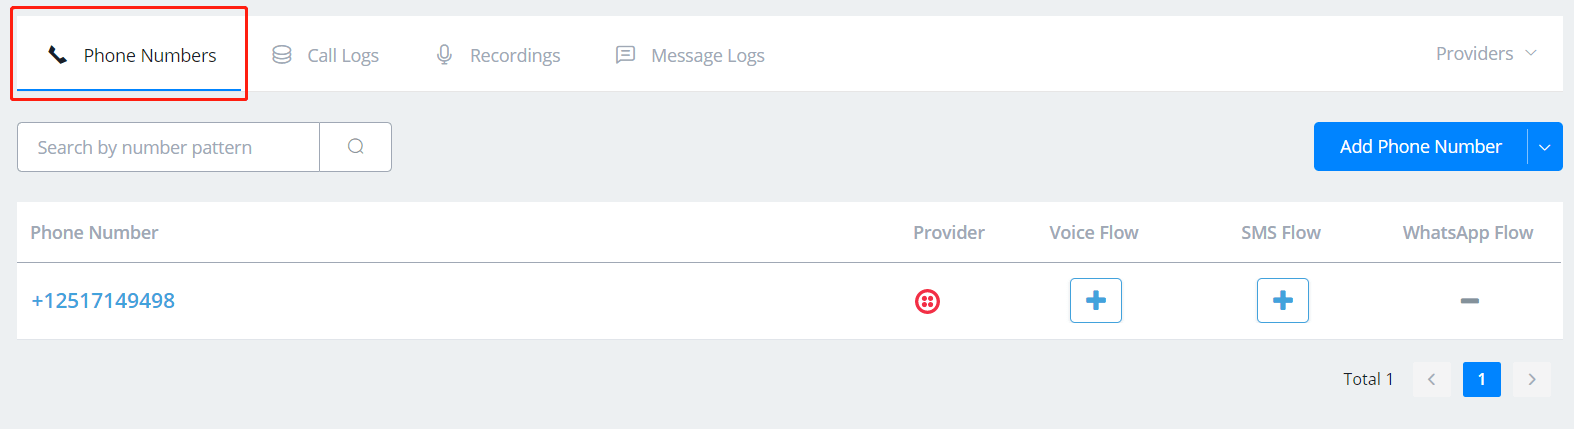
Click "Add Number" in area 3 in the above picture after connecting your provider with UChat.

Click "Find Number", the system will search all the numbers that are under your provider account. Click "Add" to add one of the numbers.
Thereafter, you are able to see all your connected numbers under the "Phone Numbers" page in "Integration".
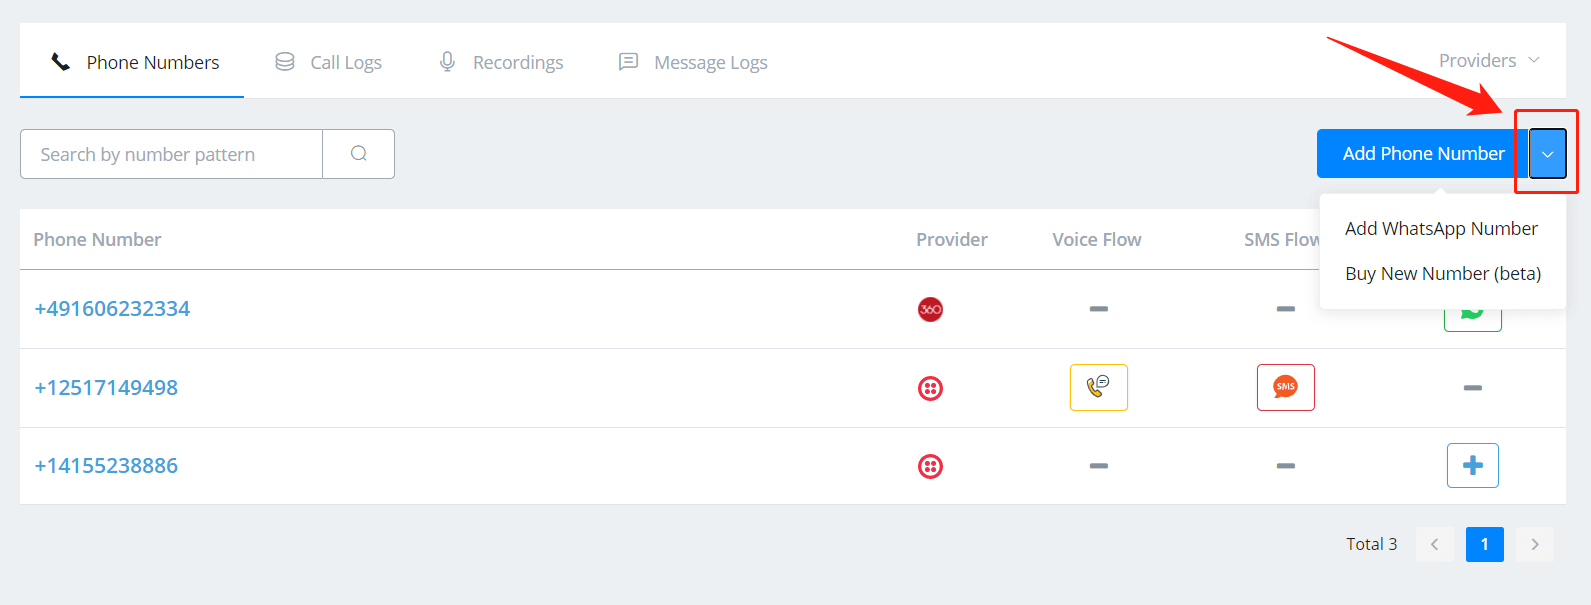
Add new numbers from the drop-down list as below: ("Buy Number" is disabled at the moment)
TIP
If you would like to disconnect the WhatsApp / Voice / SMS flow with your number, or create a new flow for that number, copy the number and click "Release Number". Then your flow will be disconnected but stay safe in your "All Bots". Add the number again to create a new flow with it.
After adding phone numbers:
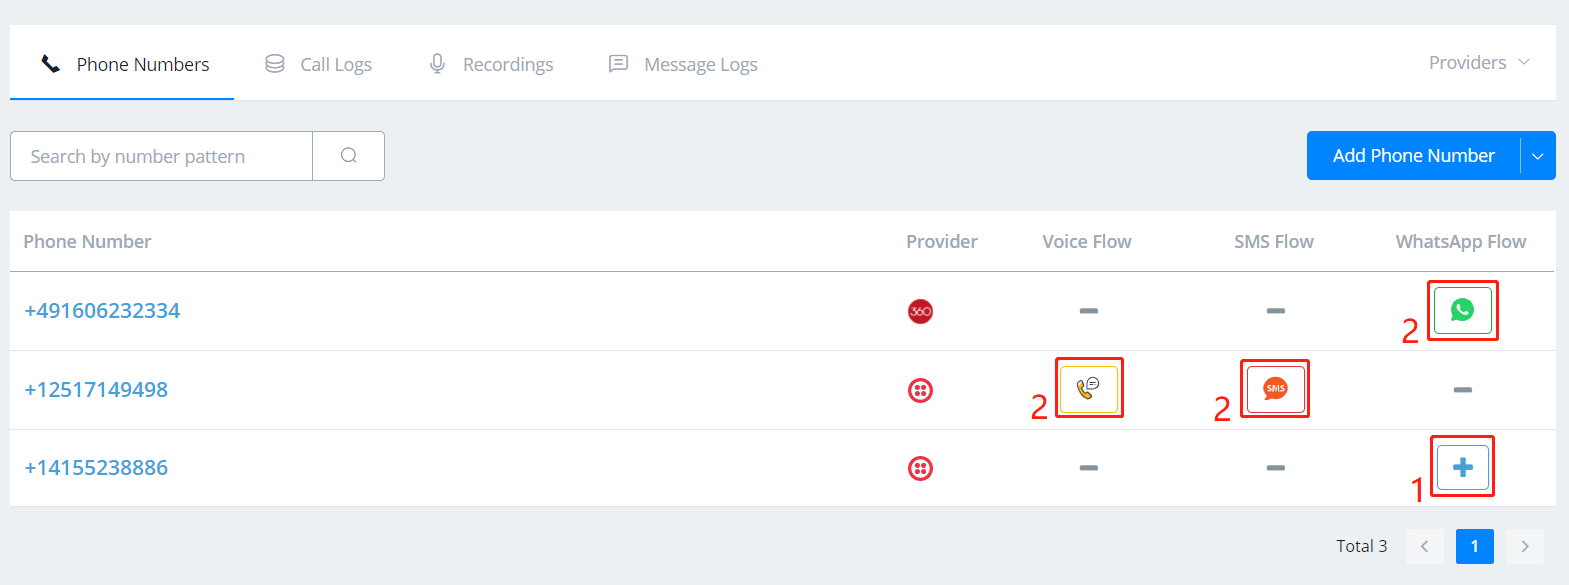
- use the plus button to create new a flow.
- button 2 is for "Open Flow" of this phone number.
# Talk to WhatsApp/SMS/Voice Bot
- WhatsApp - add the phone number as a new contact and send messages to it
- Voice - call the phone number
- SMS - send SMS messages to the phone number
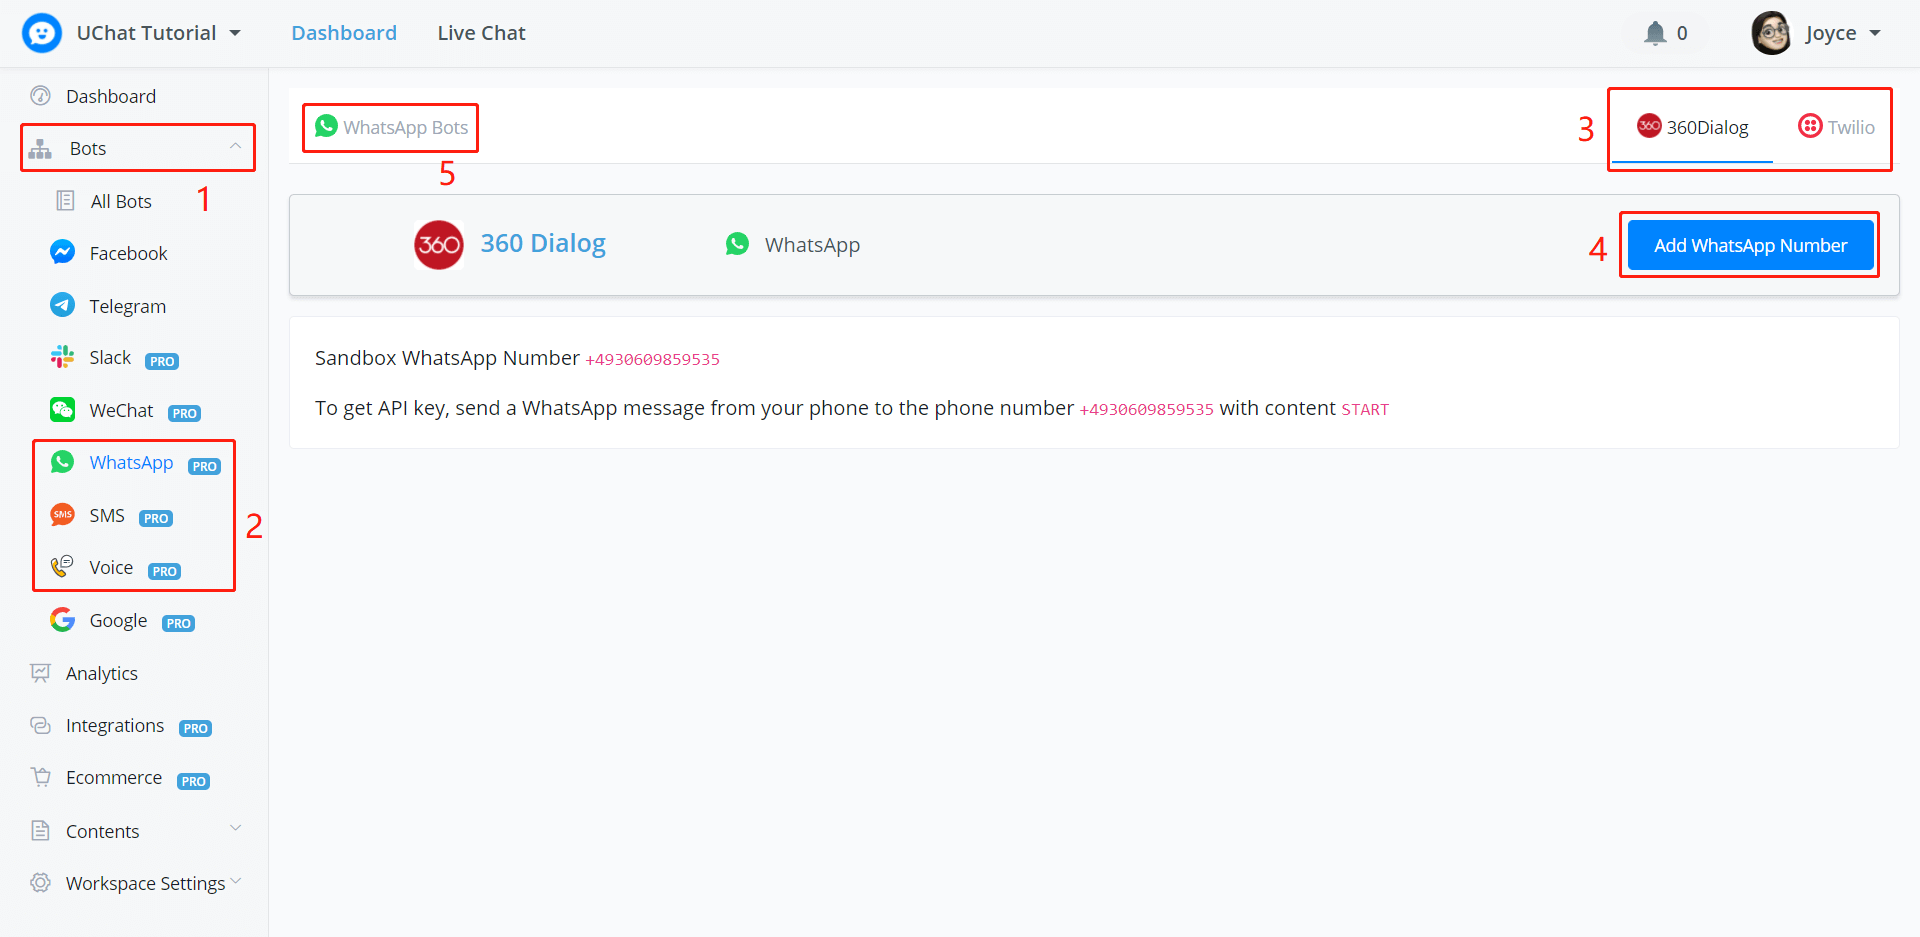
# WhatsApp + 360Dialog Sandbox
Go "Bots" -> "WhatsApp" then "360Dialog" on UChat and in your WhatsApp App, add "+4930609859535" as a new contact and sent "START" to it.
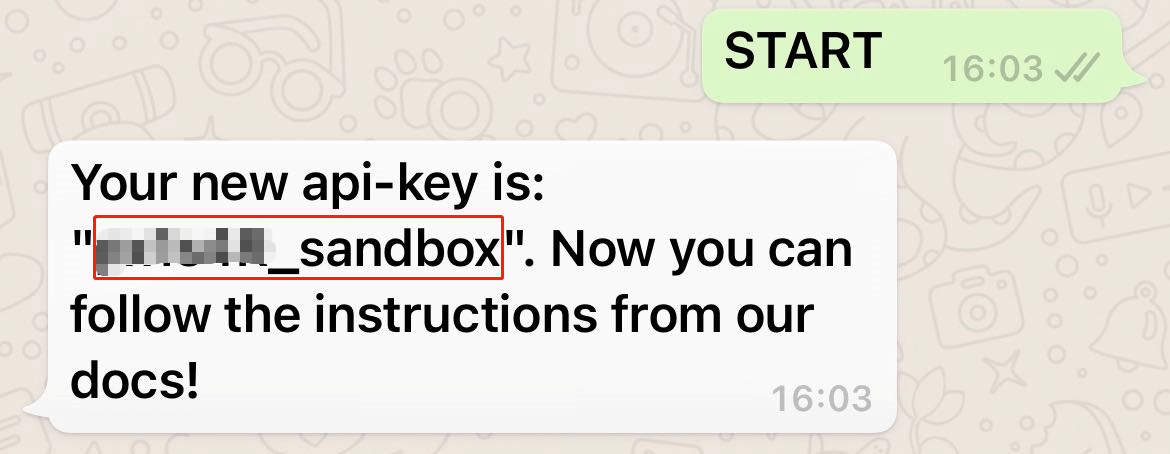
Copy the "api-key" back to UChat, click "Add WhatsApp Number":
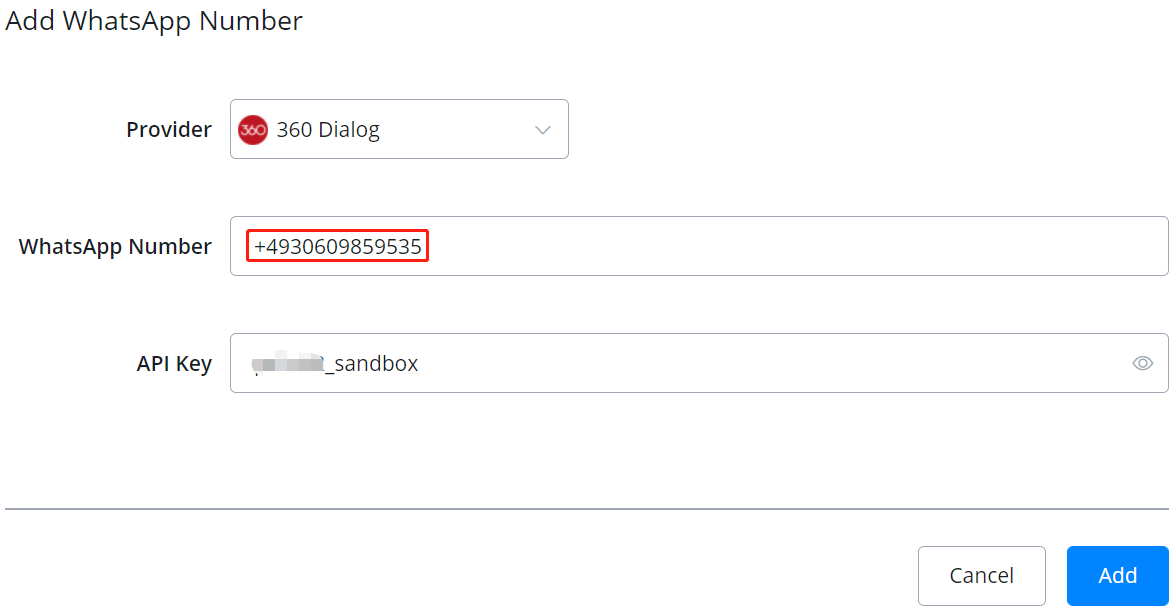
Again put the number "+4930609859535" here and paste the API key. After adding this number you can click the "Create Bot" to start building a flow.
# To use 360Dialog sandbox, please note that:
- only the phone number which requests the API key can test the bot
- you can send "START" to get a new code, but make sure you update the key with your bot.
- 360Dialog doesn't allow sandbox users to access their media recourses. For example, if you use a question step to ask for a photo and store the URL in a text variable. You are unable to visit this URL to get the photo because you are using a sandbox.
# To use 360Dialog with a $50/month plan
After testing the sandbox, to grab the US$5/month plan, check doc here.
# Google My Business
The whole process will be:
- connect Google account
- create agent, build flow & test
- verify agent
- launch chatbot
- go live
# Connect Google Account
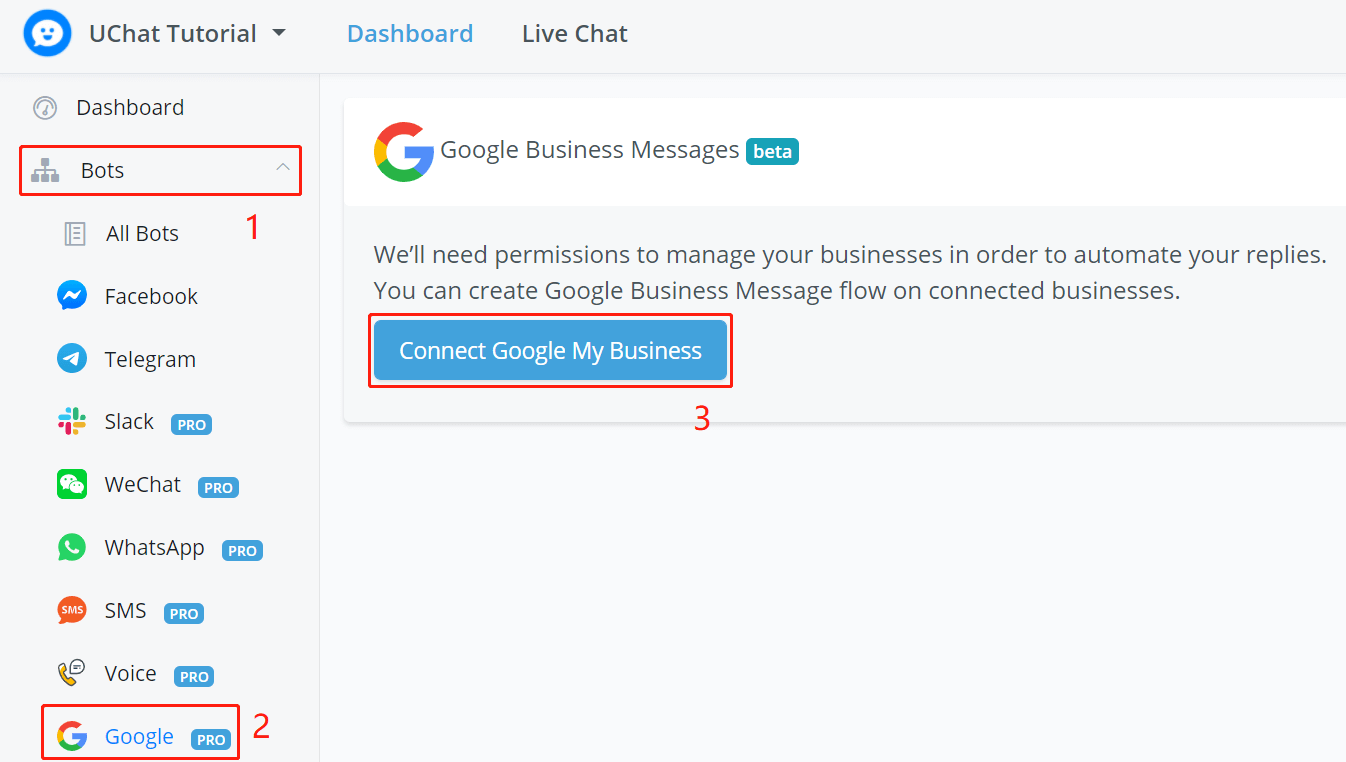
Follow steps 1, 2 and 3 to connect to your Google account.
Note
Please note that this Google account must have access to the business (either owner or manager). For agency, you will need to be invited to be the manager of your client's business.
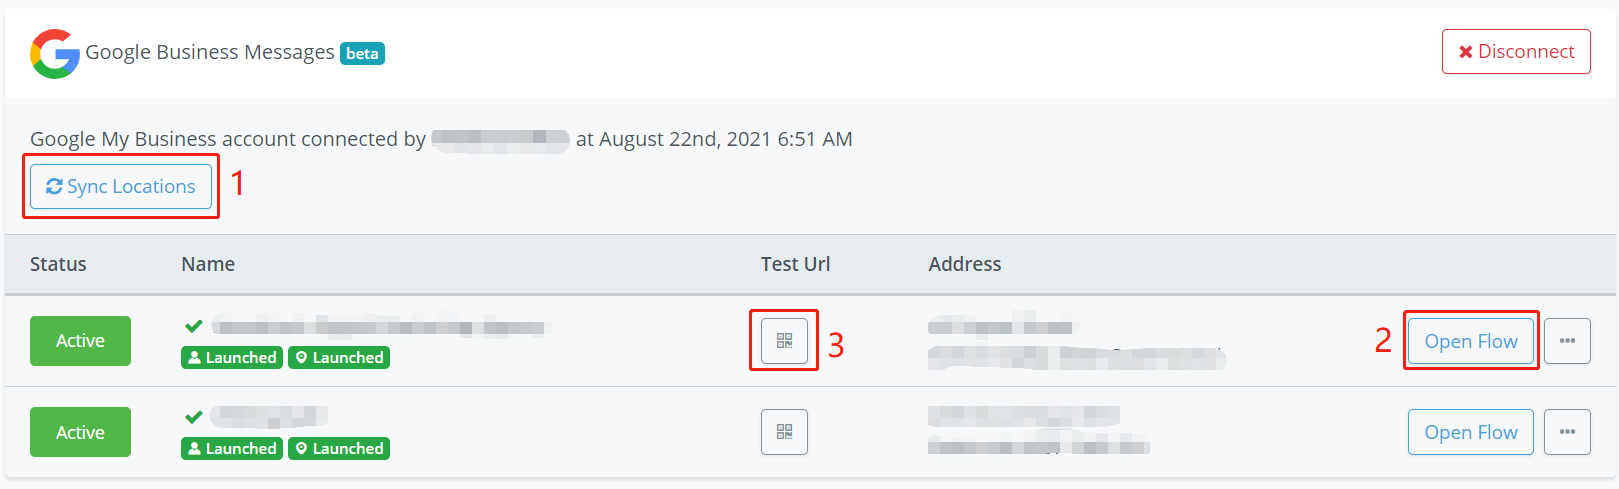
After the connection, in the above screenshot:
- click "Sync Locations" to pull all the businesses that associate with this Google account, whether they are verified or not.
- create agent then create flow
- scan the QR code or visit the URL link to test the bot in Google Map
# Create Agent
Click "Create Agent", fill in the profile information including:
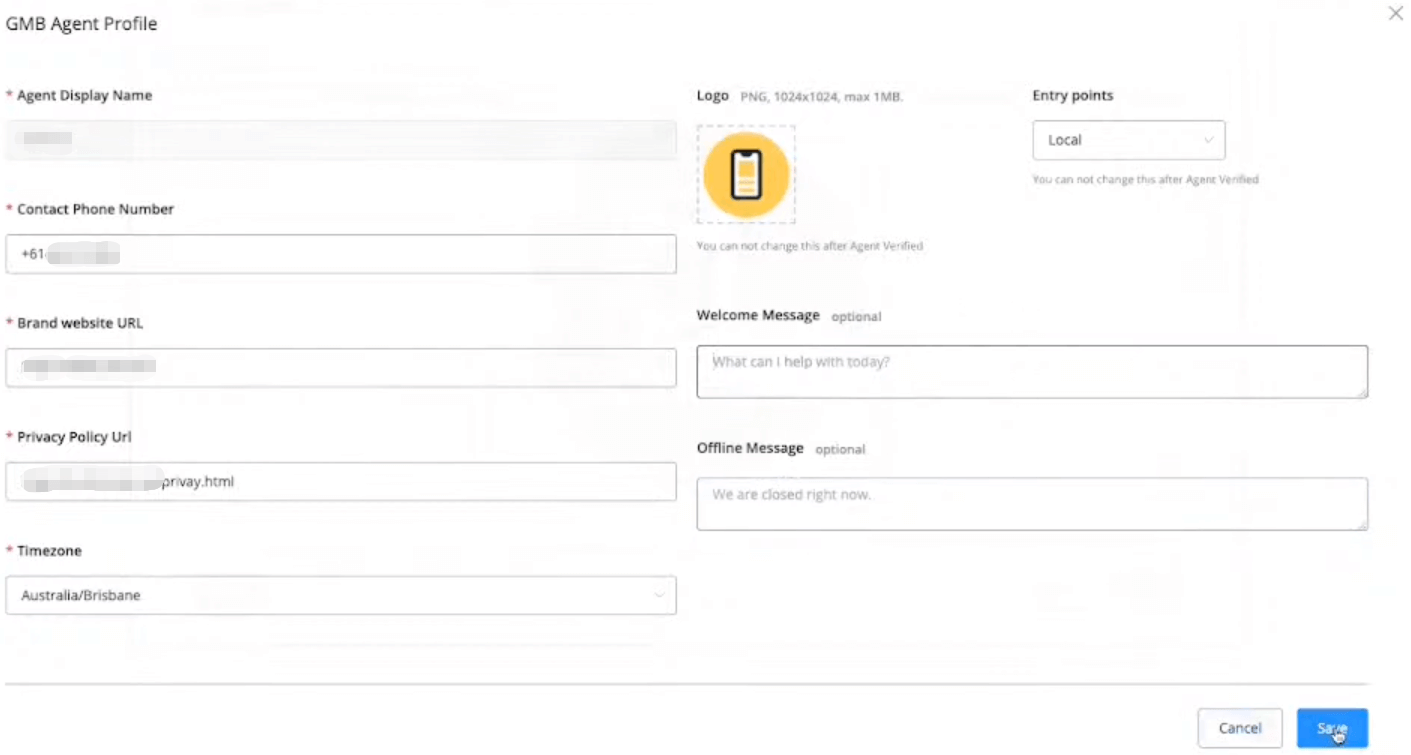
- phone number
- website address (same as your business website address)
- privacy policy URL
- timezone
- logo
- entry points (local, non-local, both local and non-local)
- welcome message
- offline message
TIP
If you get an error saying that fails to create an agent because the location is not verified, try to click cancel and refresh the page. The "Create Flow" button will show.
# Local or Non-Local
| Type | Agent Verification Process | Entry Points |
|---|---|---|
| Local | Automatically | Google search & Google map |
| Non-Local | Manual Process | Google search, Google map, site links, answer card, website buttons etc |
# Build Flow & Test the Bot
When your agent is created, click "Create Flow" to start building your bot. Check "Flow Builder" documentation for how-tos.
# Verify Agent
IMPORTANT
Build and test everything before you request an agent verification. Because once verified, it's very difficult to change the agent information. You will need to contact Google yourself.
Before you send the request, check this:
- Did I choose what suit my business best, local or non-local?
- Am I happy with all agent information like logo, contact phone, etc?
- Do I have a contact email that shares the same domain as my website?

Click the button next to the "Open Flow" button, then click "Verify Agent".
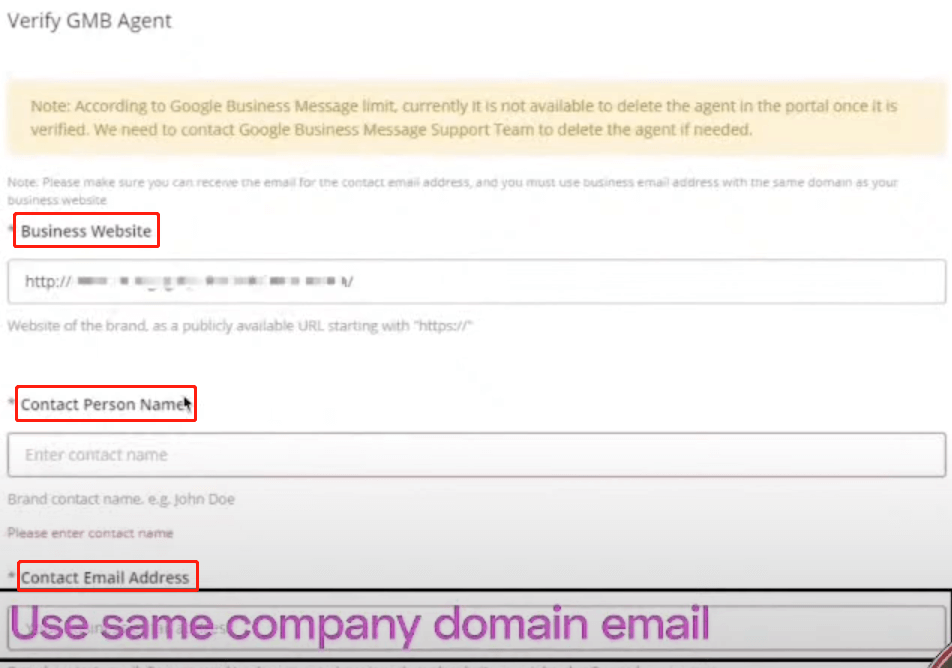
Provide a business website, contact person name and a contact email that share the same domain as the brand website.
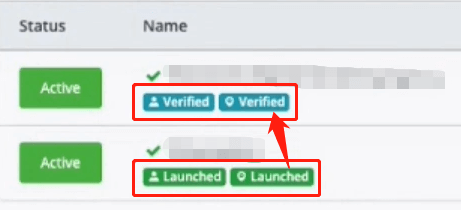
For a local business, if your business is already a verified business, your agent can be verified automatically and immediately. You will see the green "Verified" label. Thereafter, you can launch your chatbot.
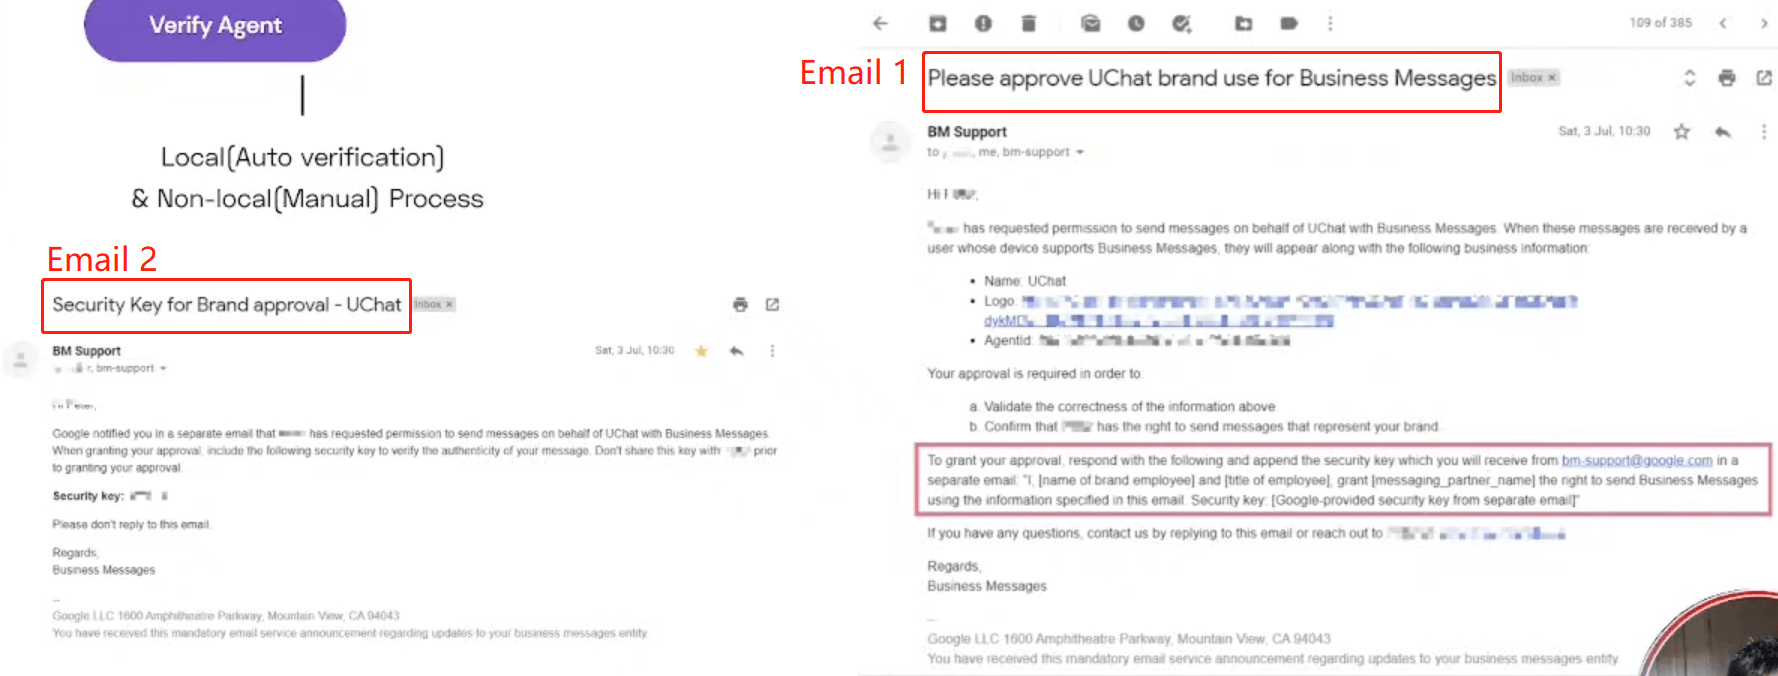
While for a non-local business, after submitting the request, you will receive 2 emails from Google. One email asks you to reply for approving UChat to help with the bot automation in a specified format (security key needed). Another email will give you the security key. It will take you a few days (up to 7 days) to get your agent verified.
# Launch Agent
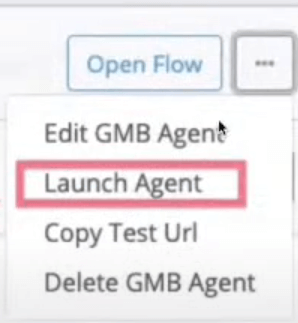
When your agent gets verified, click "Launch Agent" and a chat button will show with your business after 4-6 hours. You will see the green "Launched" label.
# Unlaunch Agent
If you wanted to stop the bot automation, click the green "Active" button under status. And to stop showing the bot with your business, you need to unlaunch your agent.
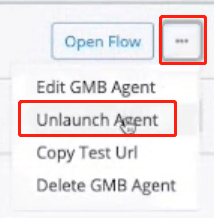
Click "Unlaunch Agent" and again, you will need to wait for 4-6 hours to see the "Chat" button disappear. By then the labels will look like this:
To launch it again, just click on "Launch Agent" again.
# Talk to Google Bot
Before you launch your bot, goto *Google section on your UChat dashboard. Visit the Test Url or scan the QR code to talk to the bot.
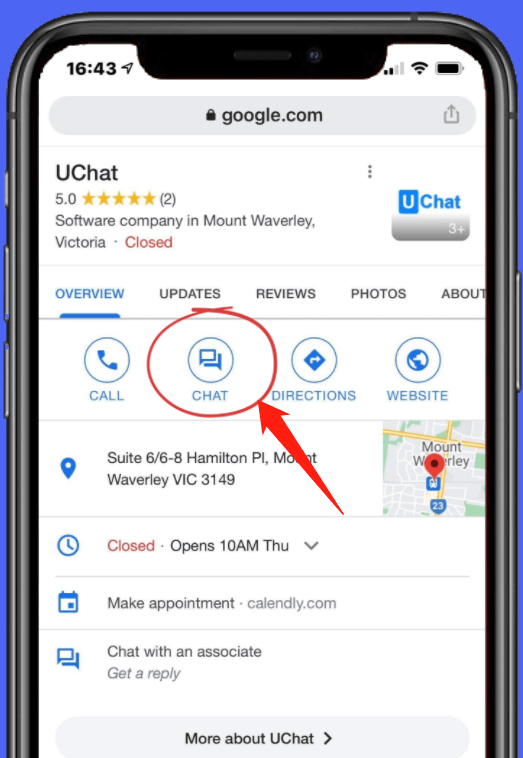
After your bot launched, Google your business name in a webpage. Click on the CHAT button to start the conversation:
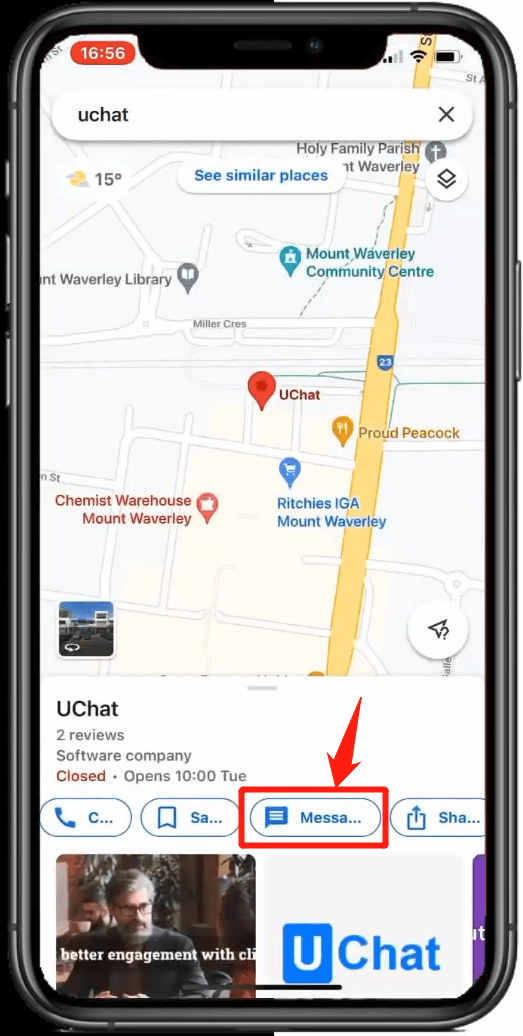
Or search your business name in Google Map. Click on the Message button to start the conversation:
# VK Bot
The whole process will be:
- create community, get group id and access token
- enable community messages and bot abilities
# Get Group ID and Access Token
You need to have a VK personal account first, go to https://vk.com (opens new window), register and login yourself.

Go to "Community" from the left sidebar and "Create Community" for your chatbot.
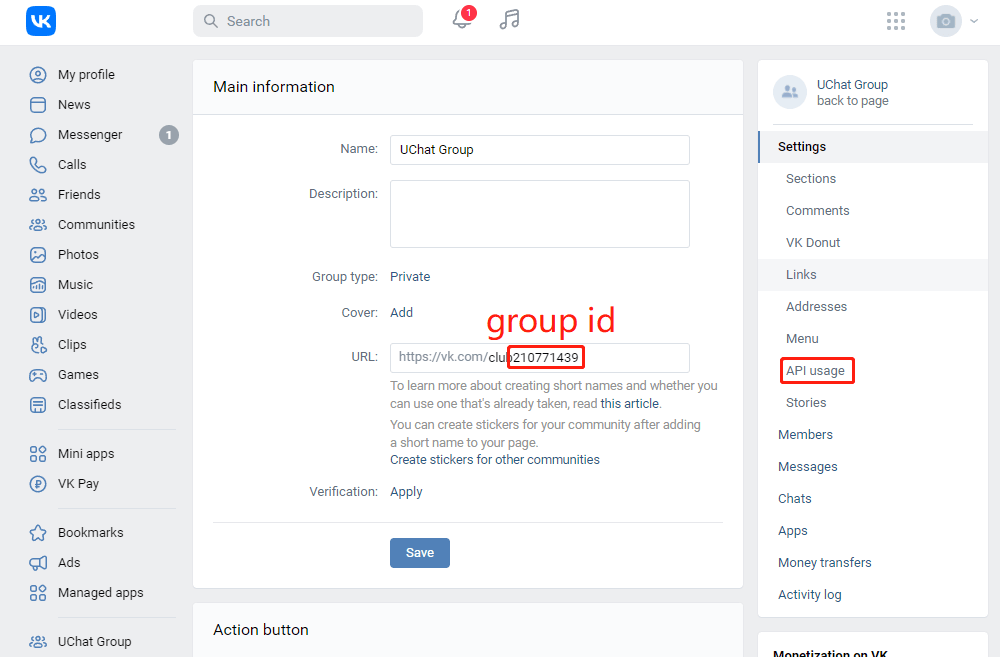
You will find your group id in the URL (see above screenshot). Click on "API usage", let's create an access token.
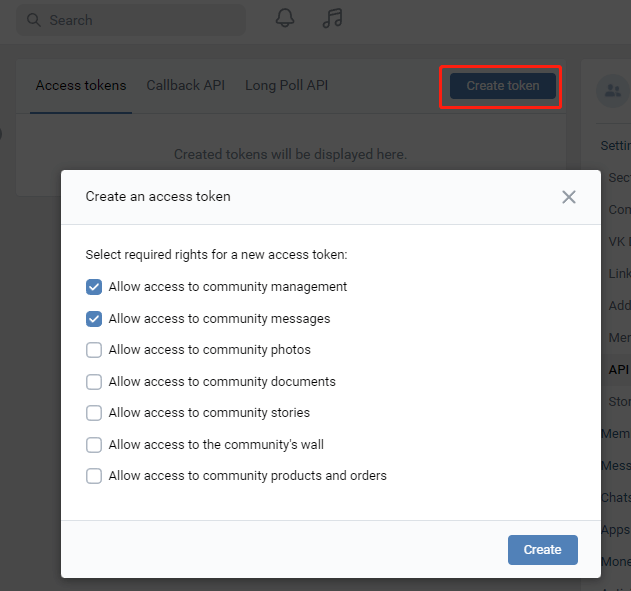
Click on "Create token", UChat only need to access your community management and messages. Tick the options and hit "Create".
TIP
You will need to download the VK application on your phone because VK will send you notifications for confirming some actions of the community.
Copy your token and group id and now let's go back to UChat.
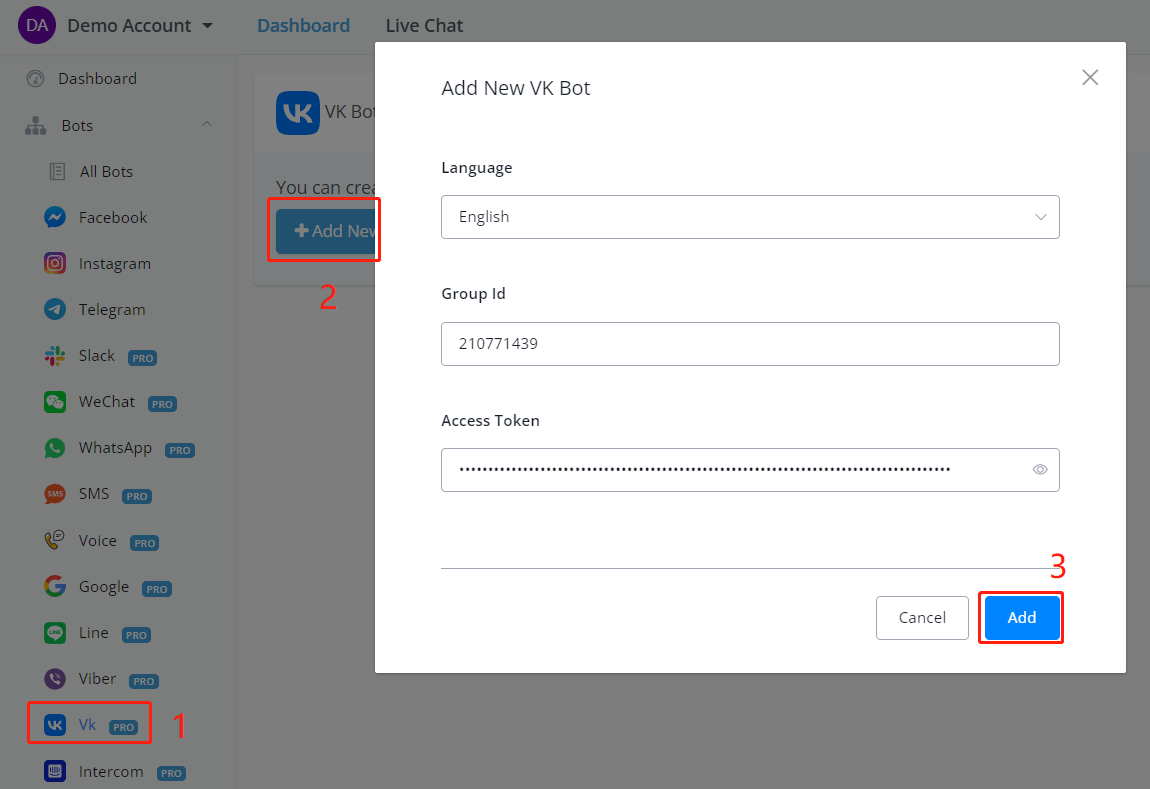
Go to VK channel, click "Add New Bot" and fill in your group id and access token, hit "Add".
Forgot your group id? You can find the community information page here:
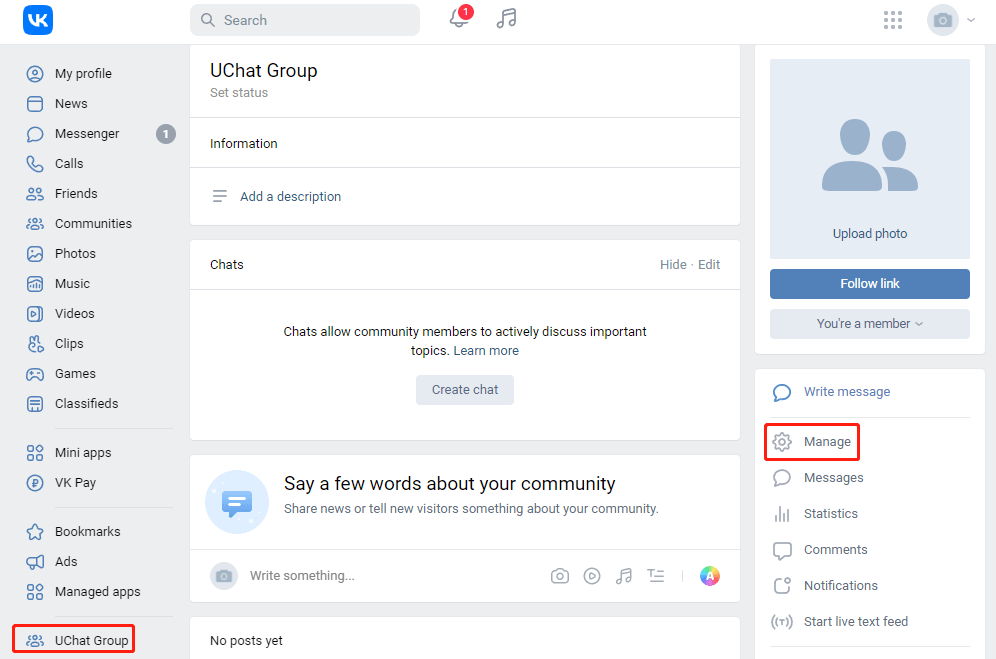
After the connection, your page looks like this:
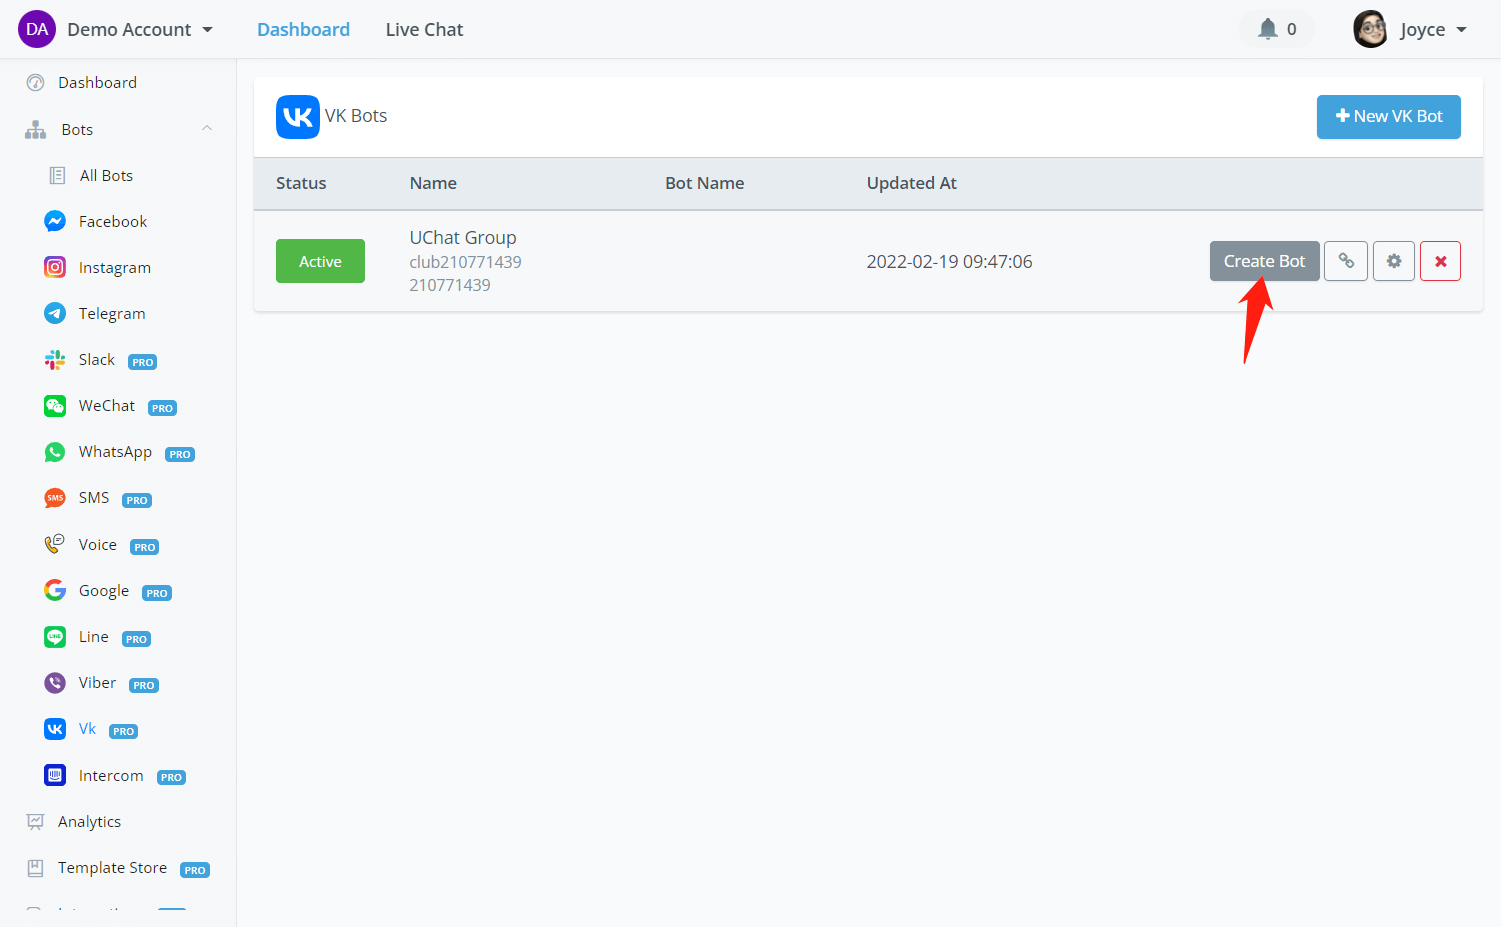
Click "Create Bot", select a template and done.
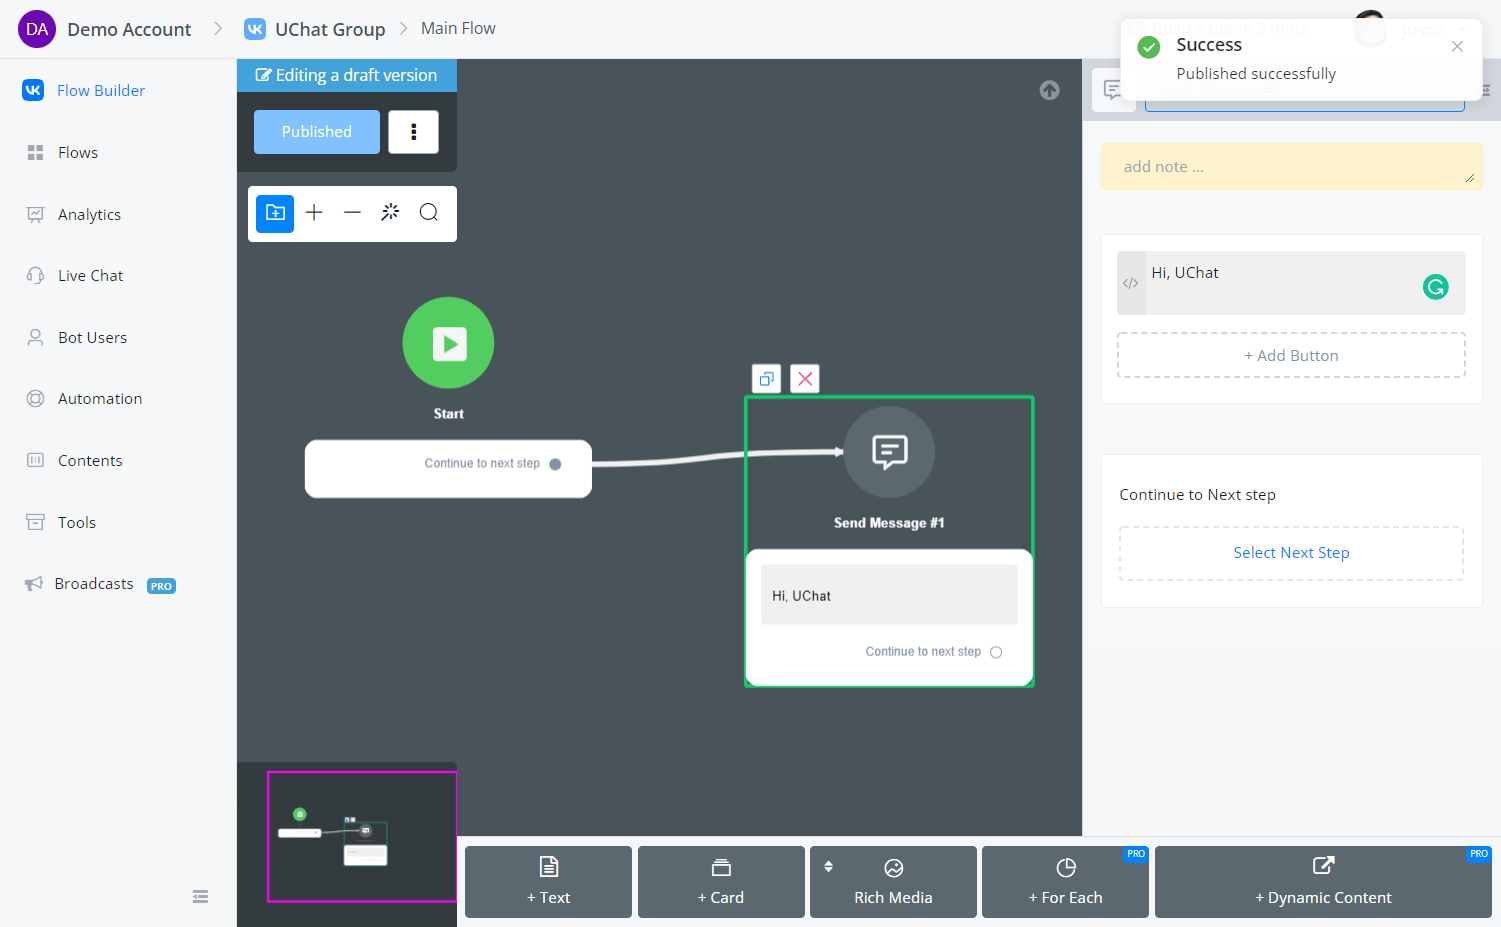
Add a simple greeting message for testing.
# Enable Community Messages and Bot Abilities
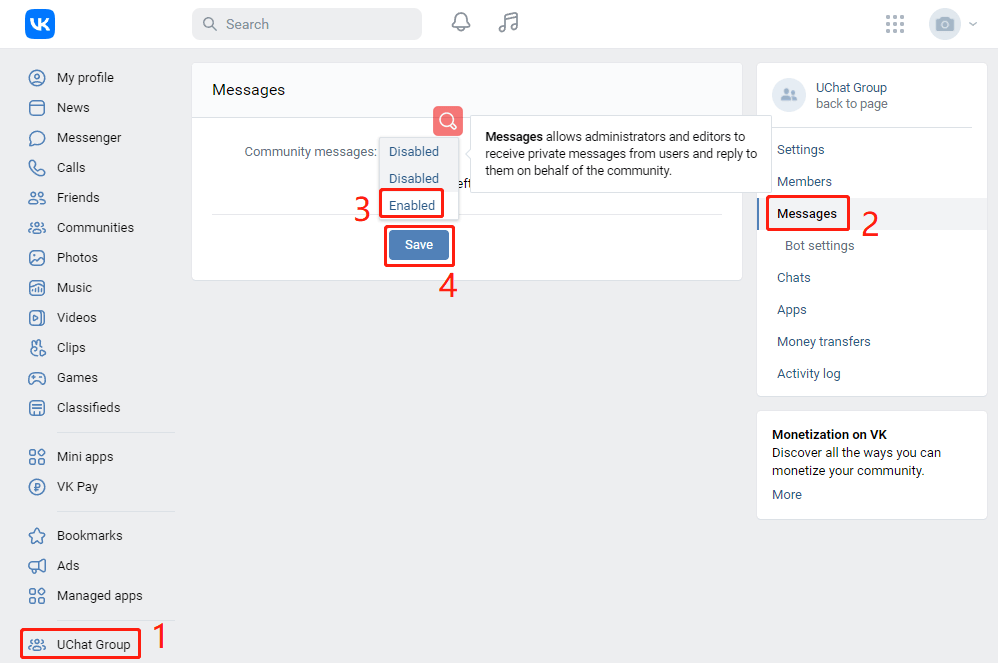
To talk to your bot, you need to enable community messages first. Follow steps 1 to 4 in the above screenshot to do so.
Then go to "Bot settings", change the bot abilities to be "Enabled" and make sure you hit the "Save" button and see the green "Changes saved" prompted. It's important to enable bot abilities so that your bot can send buttons, questions and cards instead of just text messages and media.
# Talk to Vk Bot
Now you can open your VK application on phone, search your community name and click on it:
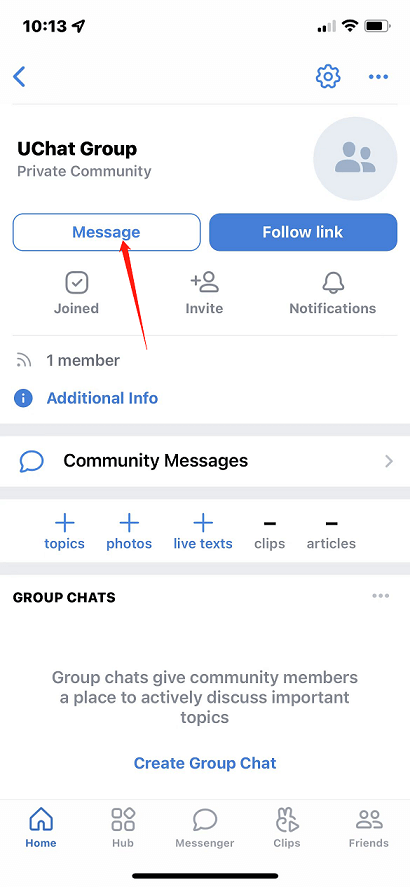
Click on "Message" to start the conversation.

# VK Limitation
There are several limitations on VK channel according to their API:
- in a card, the image should have a 13/8 ratio and there should be at least one button otherwise the card won't show.
- in a question step, there are 5 quick answers at most.
- in a file question, the file uploaded by the user is sent to VK and VK return an URL pointing to the file back to UChat. Please note that this URL isn't a direct file link. Therefore you cannot send a file type message based on this URL. You can print the URL instead and by clicking this URL, users can access the file.
# Intercom Bot
Intercom is a popular live chat platform, UChat integration with Intercom will help reduce 80% of the support through chatbot automation & A.I.
# Key Benefits
Solve the customer's support issues in the chatbot automation and Google Artificial intelligence before they hit your support team.
# No Coding Knowledge Required
You don’t need to be a developer or learn coding to use UChat. With our drag & drop flow builder, you can easily build out your automation logic.
# 11+ channels supported & increasing
Currently, UChat connects your intercom with your customers from Instagram, Messenger, WhatsApp, Google Business Messenger, Telegram, Viber, Line, SMS, Voice, Slack, Wechat, and more channels are added to the platform. Reach your customer through automation & live chat wherever they are.
# Omnichannel flow builder
With our omnichannel flow builder, you can build your automation logic once, and apply it to all the social channels we support(Instagram, Messenger, WhatsApp, Google Business Messenger, Telegram, WeChat, Line, Viber)
# Artificial Intelligence
Recognize customer intent using Google Dialogflow, and redirect them to your chatbot automation. Only transfer the unrecognized intent to your live chat support. It will save you huge time on your live chat support.
# Integration with 3rd party
UChat has built-in integration with Stripe, Paypal, Cloudinary, Shopify, Woocommerce, Calendly, Slack, Google Sheet, Twilio, SingalWire, message Media, Gmail, Sendgrid, Mailchimp, ActiveCampaign, Zapier, Integromat & Pabbly Connect. You can easily sync the leads & sales into your own CRM or Project management tools.
# Connect to Intercom
# Step 1: Connect with your Intercom account
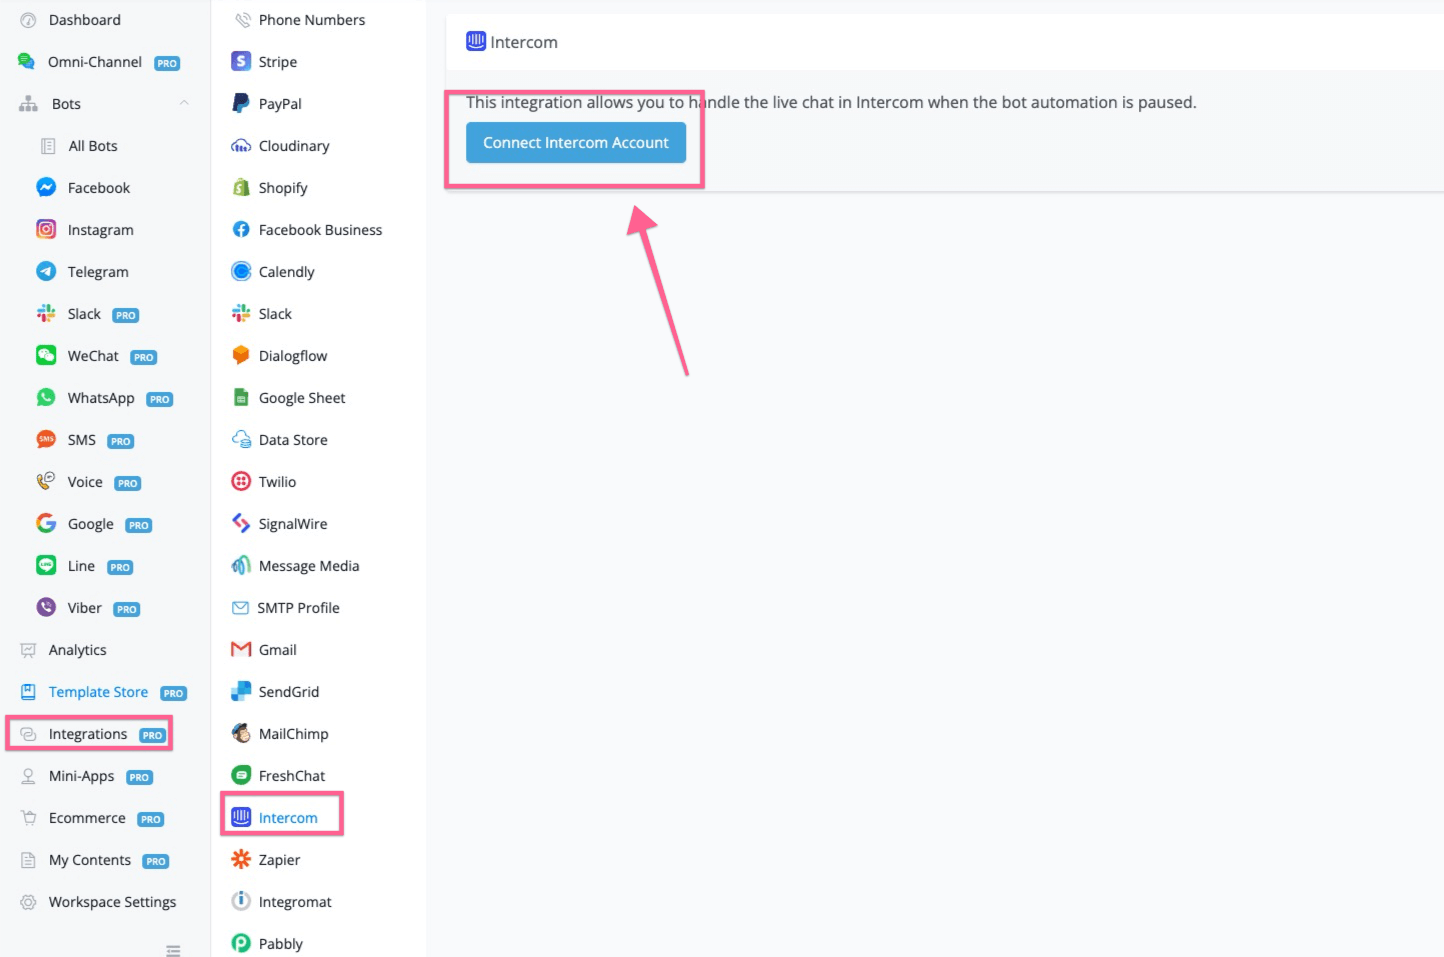
In this step, you will need to connect with your intercom account inside of UChat. After you log in UChat, you need to go to integration, and then go to Intercom, click the connect intercom account button.
# Step 2: Authorize intercom account
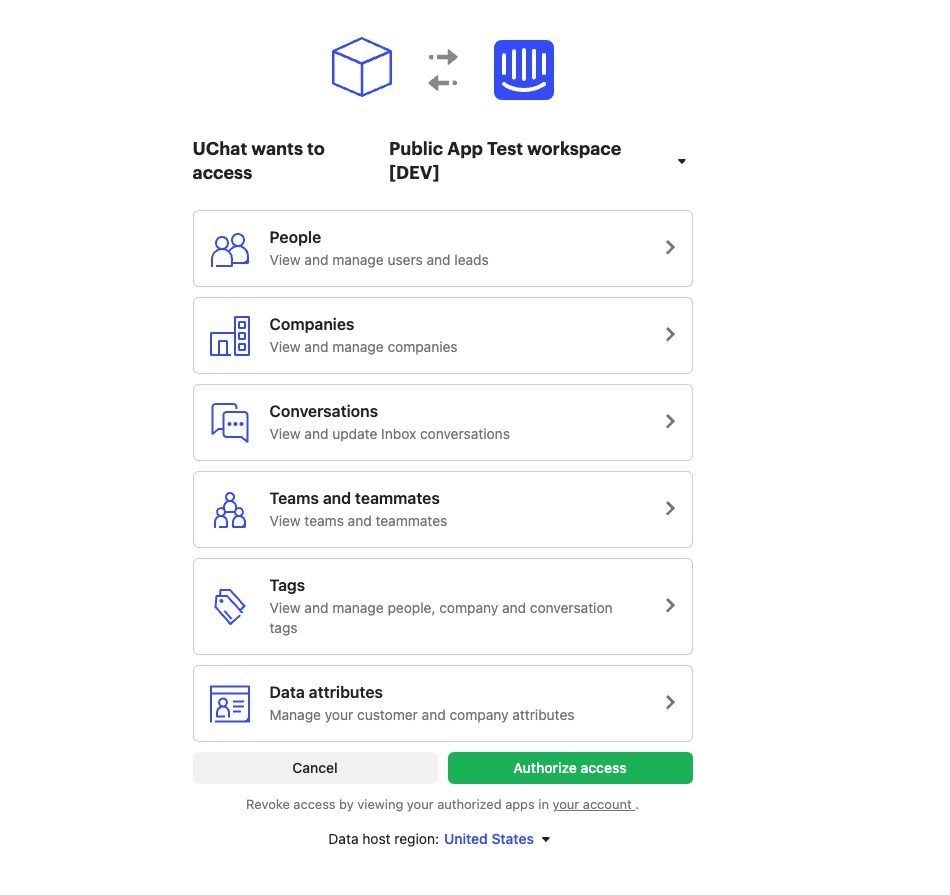
After you click connect intercom button, it will redirect you to log in to your intercom account and then you will see the screenshot above, click “Authorize access” and then you just added this app to your workspace.
After authorization, it will show up as below.
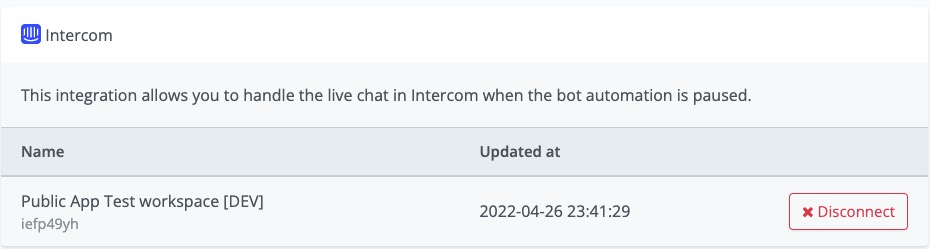
You can disconnect the app, by clicking the button to disconnect Intercom with this workspace.
# Step 3: Switch livechat to intercom
After you integrate with the intercom, you now need to create an omnichannel chatbot inside of UChat. You might need to link the channels we currently support(Facebook messenger, Instagram, WhatsApp, Google Business Messenger, WeChat, Line, Viber, Telegram).
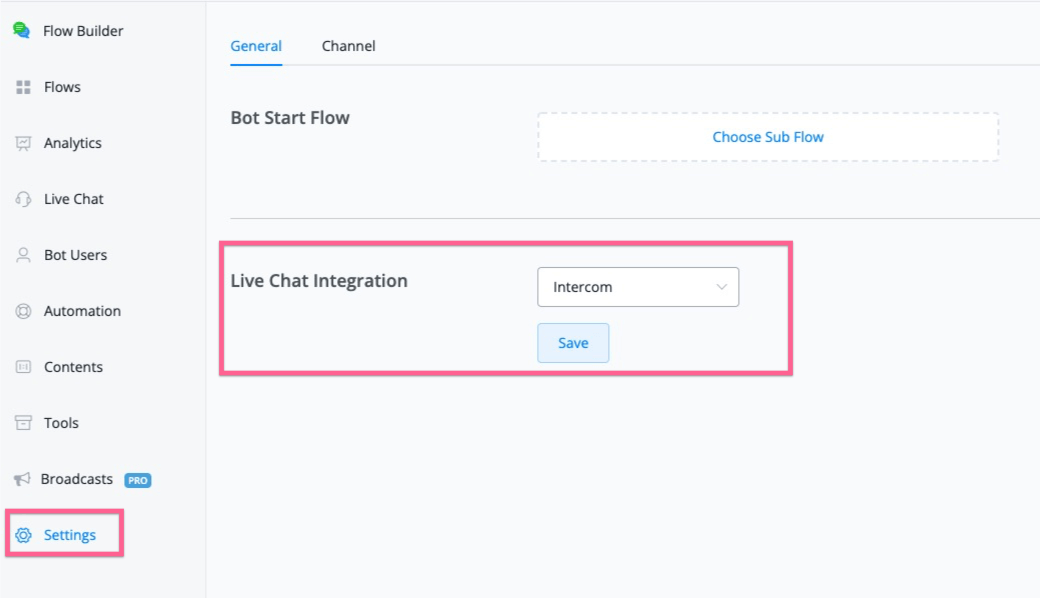
After you linked the channel, you can open the bot, then go to the settings of the omnichannel, and select intercom from the live chat integration.
# Use Intercom
# Step 1: Trigger “Talk to Human/Pause automation” anywhere in the flow

The benefits of using UChat with intercom is that, your business can automate at least 80% with chatbot & A.I. You can easily build your chatbot with our visual flow builder, and if at any point, your customer needs any help.
You can connect with an Action, and then go to Basic Actions, then you can find “Talk to human/Pause automation”, and then your customer from 11+ social channels can talk directly to your intercom live chat support.
After your customer initiates a conversation, you will see the new contacts created from social channels along with their questions.
UChat will pull the user’s profile, email & phone to create the contact if there is any.
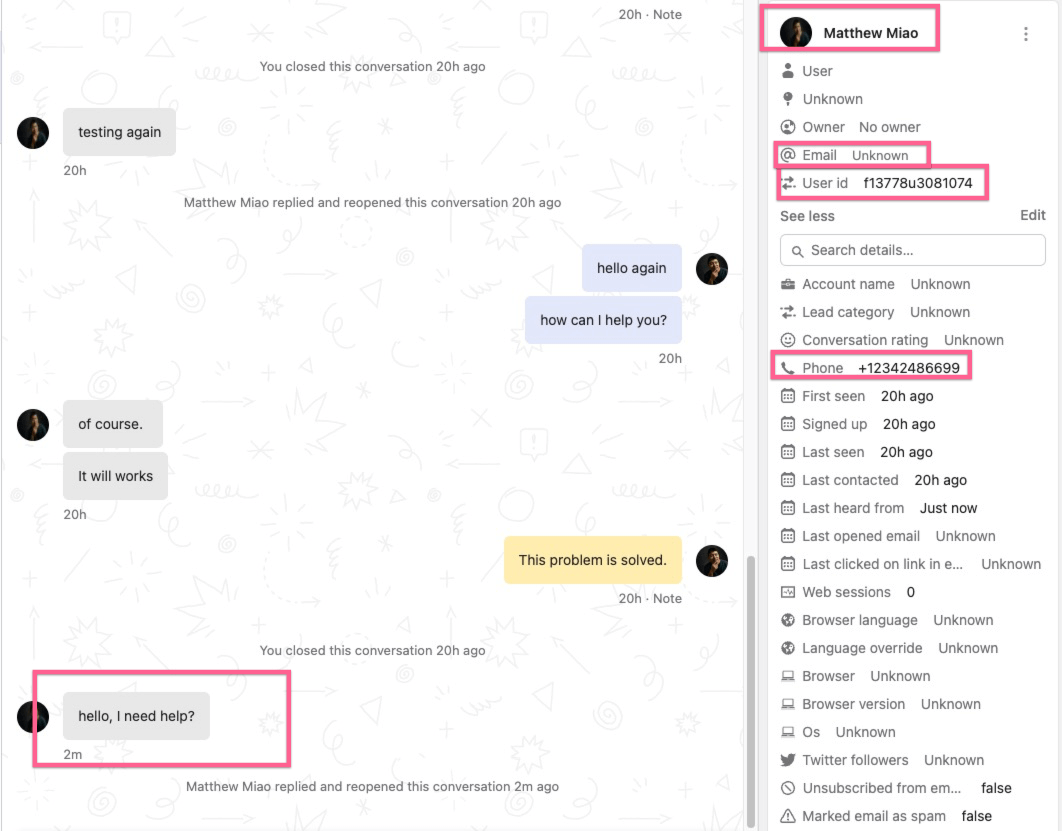
And now your intercom agent can talk directly back to the customer from 11+ social channels.
By default, the live chat is set at 30 mins, after the time passed, if there is no active conversation, the user will be sent back to chatbot automation.
# Step 2: Sending files & Images
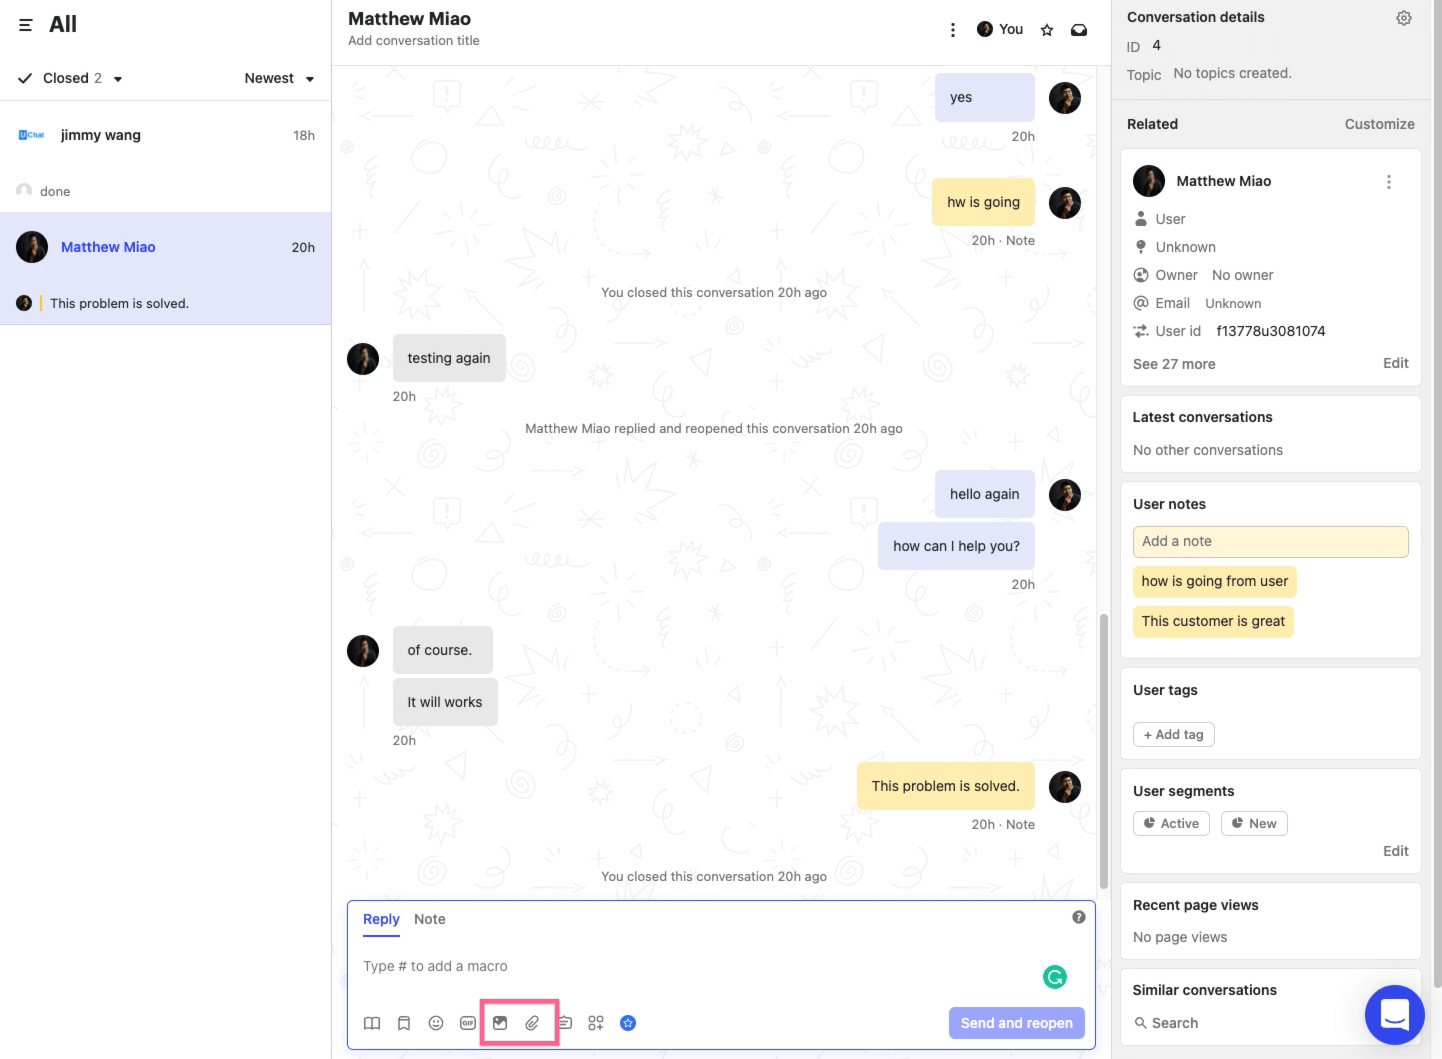
After your customer active live chat from our flow, your customers can send text, images & files to your agent.
Meanwhile, your intercom agent can also send images & files back to the user.
If the intercom agent adds any notes to the customer/conversation, the note content will also sync to UChat’s subscribers
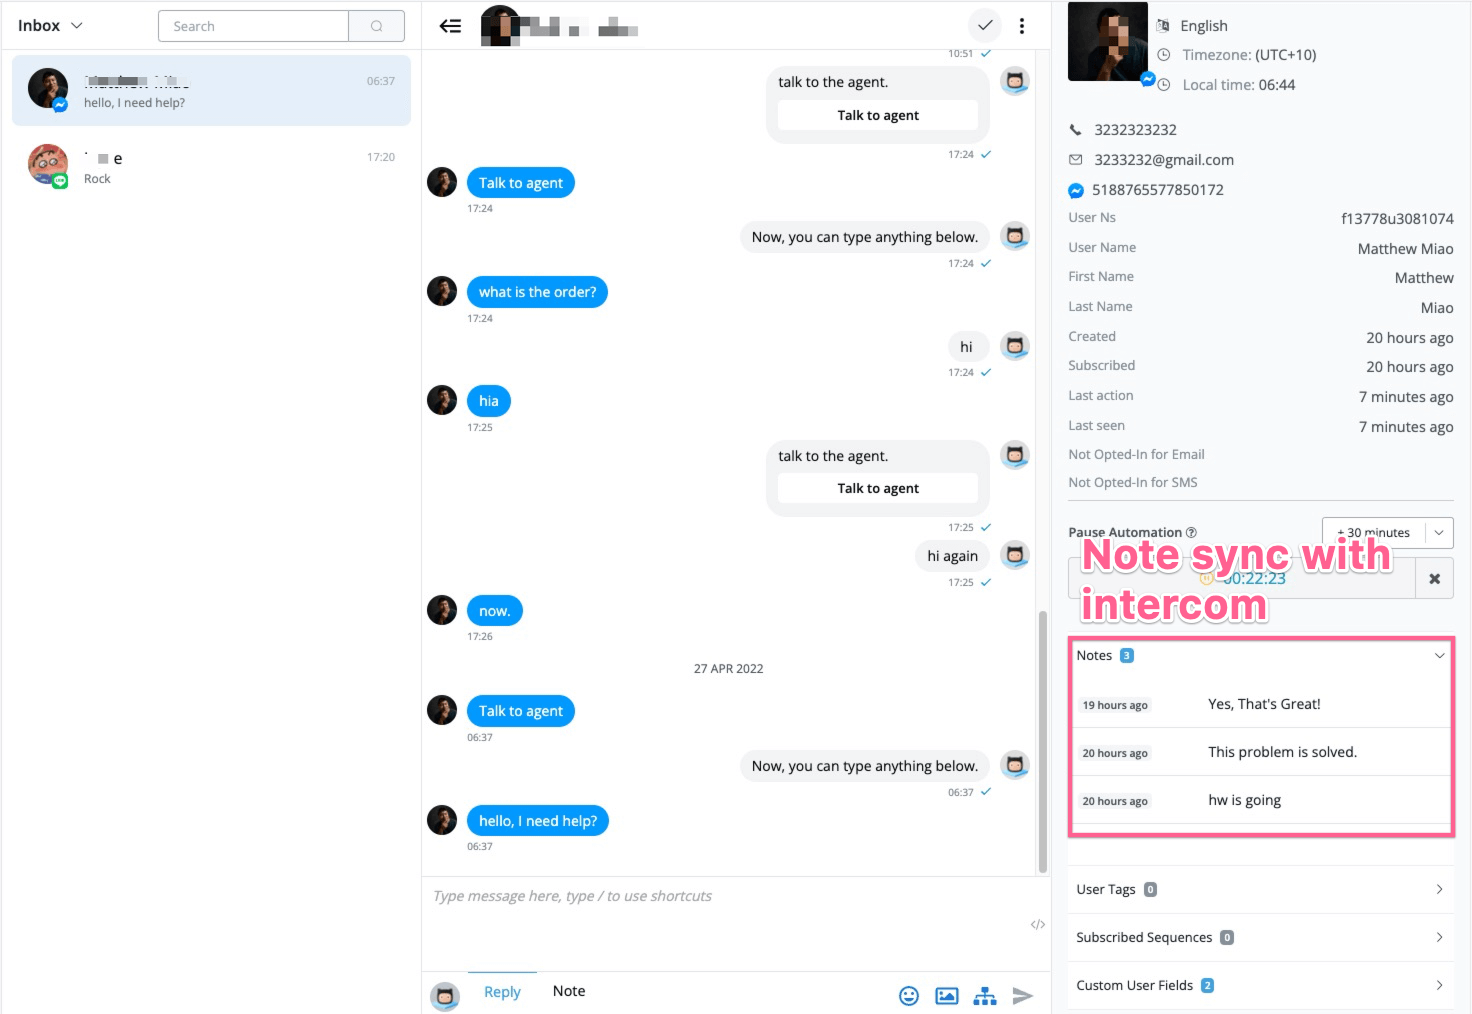
Please note that you can also see all the live chat history inside of UChat’s live chat.
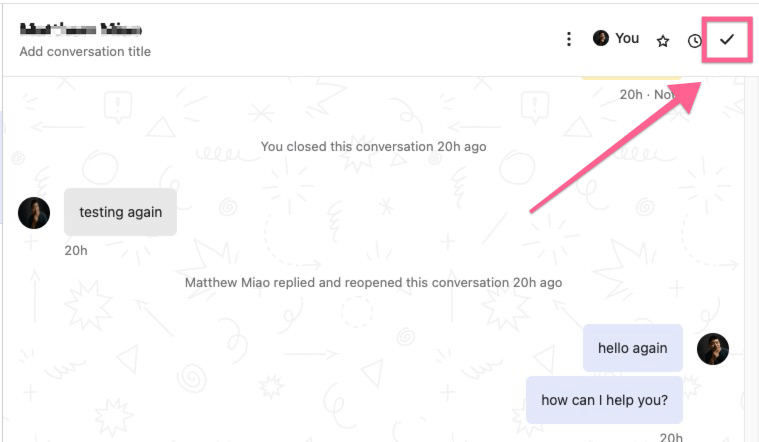
# Step 3: Ending conversation
If your intercom live chat support helps the user solve the issue, and when they close the conversation, the user will be pushed back to the chatbot automation.
If intercom live chat decides to follow up on the issue, for certain channels(Messenger, WhatsApp, Instagram) if it’s within 24 hours window, we will deliver the message. If it’s out of the 24-hour window, we will reply that the user is out of the contact window.
If the user is within the contact window, any messages from the intercom agent will reset the 30 human support window & activate live chat with the user.